
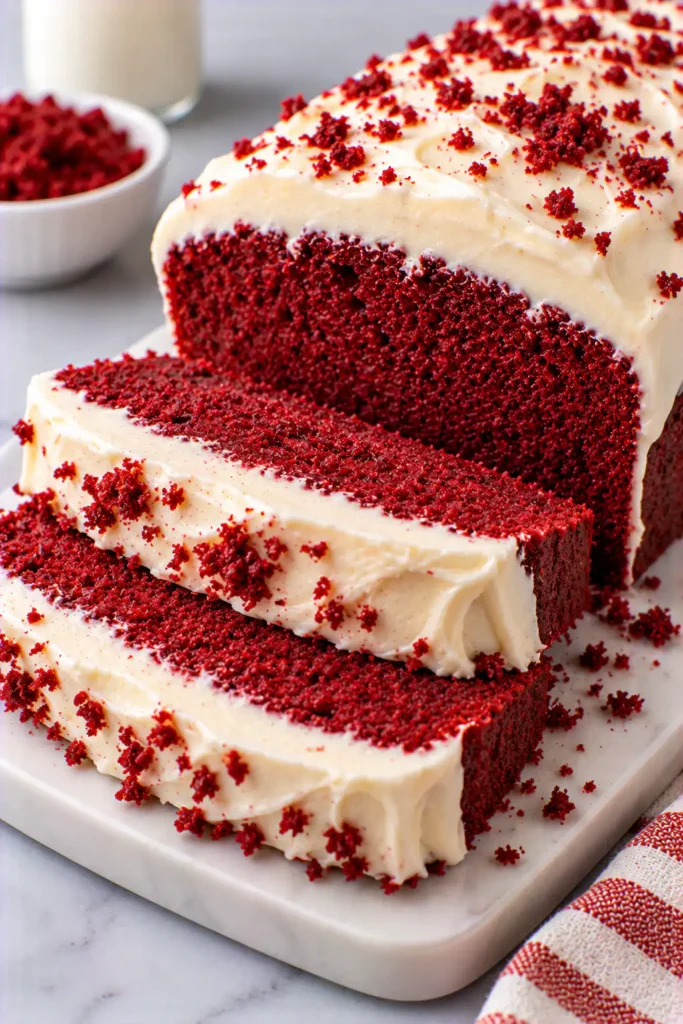
There is something extra special about a homemade red velvet cake. The beautiful ruby-red color, soft cocoa flavor, and tender crumb make it feel like a dessert for a special occasion, yet this Red Velvet Loaf Cake with Vanilla Frosting is surprisingly simple to make.
Baked in a loaf pan, this cake has that familiar red velvet flavor in a smaller, more manageable format. The cake itself is lightly chocolatey, moist, and buttery, while the creamy vanilla frosting adds just the right amount of sweetness.
Whether you’re preparing dessert for a family dinner, looking for an afternoon treat with coffee, or planning something festive for the holidays, this easy red velvet loaf cake is a delicious choice. The simple loaf shape also makes it easy to slice, serve, and store.
Table of Contents
Why You’ll Love Red Velvet Loaf Cake with Vanilla Frosting
- Soft and Moist Texture
Every slice has a tender crumb with just enough richness to make the cake satisfying without feeling overly heavy. - Classic Red Velvet Flavor
A gentle cocoa flavor pairs beautifully with vanilla, creating that familiar red velvet taste without overpowering the frosting. - Easy Loaf-Pan Recipe
You don’t need to assemble multiple cake layers or spend time decorating. The loaf shape keeps the preparation simple. - Creamy Vanilla Frosting
The smooth frosting provides a sweet contrast to the lightly chocolatey cake and makes every bite feel more indulgent. - Perfect for Any Occasion
Serve it for birthdays, holidays, afternoon coffee, Valentine’s Day, or simply when you’re craving a homemade dessert.
What Makes Homemade Better?
A homemade red velvet loaf cake has a warmth and freshness that’s difficult to get from a packaged cake.
You control the texture, sweetness, cocoa flavor, and frosting. Freshly baked cake also has a soft crumb and delicate aroma that makes the kitchen smell wonderful.
Another advantage is flexibility. You can make the frosting thicker for a generous topping, keep it light for a more understated finish, or add simple decorations depending on the occasion.
Most importantly, homemade baking gives you the chance to enjoy the cake while it’s fresh. A slice of tender red velvet cake with creamy vanilla frosting alongside a cup of coffee or tea is a simple pleasure that’s hard to beat.
Ingredients You’ll Need
For the Red Velvet Loaf Cake
- All-purpose flour – Provides the structure needed for a soft but sturdy loaf.
- Unsweetened cocoa powder – Adds the subtle chocolate flavor that gives red velvet cake its signature taste.
- Granulated sugar – Brings sweetness while helping create a tender texture.
- Baking powder – Helps the loaf rise and become light.
- Baking soda – Works with the acidic ingredients to provide additional lift.
- Salt – Balances the sweetness and brings out the cocoa and vanilla flavors.
- Unsalted butter – Adds richness and helps create a soft, flavorful crumb.
- Vegetable oil – Helps keep the cake moist even after it cools.
- Eggs – Give the loaf structure while contributing richness and tenderness.
- Buttermilk – Adds gentle tanginess and helps create the classic tender red velvet texture.
- Vanilla extract – Enhances both the cocoa flavor and the sweetness of the cake.
- Red food coloring – Gives the loaf its recognizable red velvet appearance.
- White vinegar – Adds acidity and works with the baking soda while complementing the traditional red velvet flavor.
For the Vanilla Frosting
- Unsalted butter – Creates the creamy, rich base of the frosting.
- Powdered sugar – Provides sweetness while keeping the frosting smooth and easy to spread.
- Vanilla extract – Gives the frosting its warm vanilla aroma.
- Heavy cream or milk – Helps loosen the frosting and creates a smooth, spreadable consistency.
- Salt – A small amount balances the sweetness and keeps the frosting from tasting flat.
Step-By-Step Direction
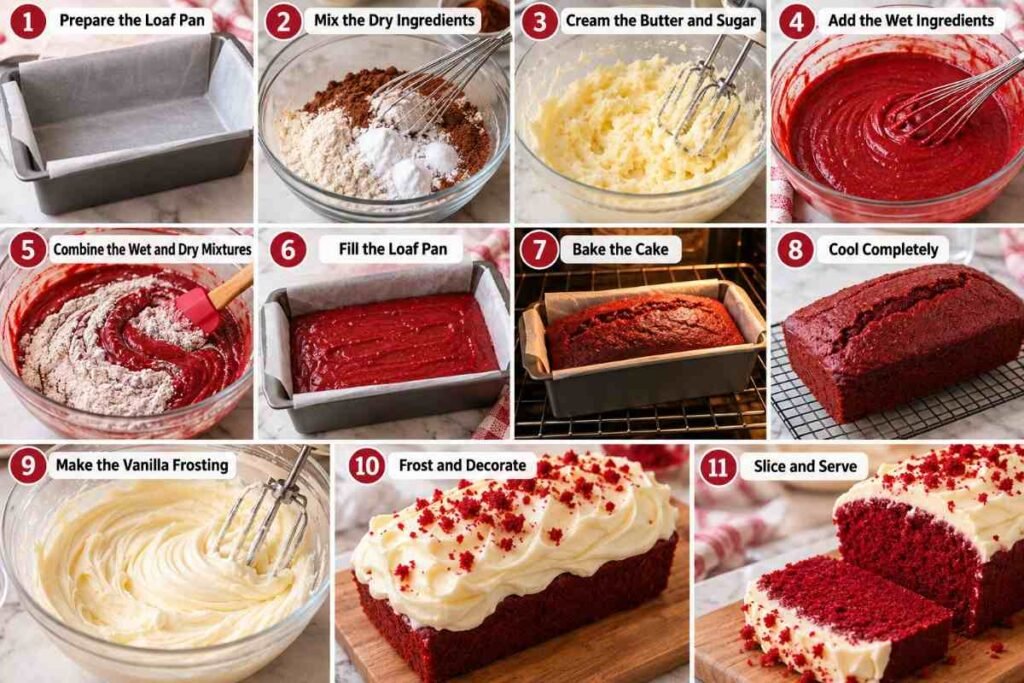
1. Prepare the Loaf Pan
Grease a loaf pan thoroughly and line it with parchment paper, leaving some paper hanging over the sides. This makes the finished cake much easier to lift from the pan.
2. Mix the Dry Ingredients
Whisk together the flour, cocoa powder, baking powder, baking soda, and salt in a bowl. Breaking up any cocoa lumps at this stage helps create an evenly textured cake.
3. Cream the Butter and Sugar
Beat the softened butter with the sugar until the mixture looks lighter and creamy. This step helps incorporate air into the batter and contributes to a tender texture.
4. Add the Wet Ingredients
Beat in the eggs one at a time, followed by the oil, buttermilk, vanilla, red food coloring, and vinegar. Mix until the ingredients are well combined.
Don’t worry if the batter looks particularly vibrant at this stage. The color will develop beautifully as the cake bakes.
5. Combine the Wet and Dry Mixtures
Gradually add the dry ingredients to the wet mixture. Stir gently just until everything comes together.
Avoid overmixing. Once the flour disappears, stop stirring. Overworking the batter can make the finished loaf denser instead of soft and tender.
6. Fill the Loaf Pan
Transfer the batter to the prepared loaf pan and smooth the top with a spatula.
Give the pan a gentle tap against the counter to release any large air pockets.
7. Bake the Cake
Place the loaf in a preheated oven and bake until the center is set and a toothpick inserted into the middle comes out clean or with a few moist crumbs.
Try not to open the oven repeatedly while the cake is baking because sudden temperature changes can affect how the loaf rises.
8. Cool Completely
Allow the cake to cool in the pan briefly before transferring it to a wire rack.
Let it cool completely before frosting. A warm cake can cause the vanilla frosting to soften and slide off the surface.
9. Make the Vanilla Frosting
Beat the softened butter until smooth. Gradually add the powdered sugar, then mix in vanilla and enough cream or milk to achieve a smooth, creamy consistency.
If the frosting feels too thick, add a tiny amount of liquid. If it becomes too thin, add more powdered sugar.
10. Frost and Decorate
Spread the vanilla frosting over the completely cooled red velvet loaf.
For a simple homemade appearance, use the back of a spoon or an offset spatula to create soft swirls across the top. You can finish it with a light sprinkle of red velvet cake crumbs if desired.
11. Slice and Serve
Use a sharp knife to cut the loaf into even slices. For cleaner cuts, wipe the knife between slices.
The contrast between the deep red cake and pale vanilla frosting makes this loaf especially pretty on a dessert plate.
Serving Suggestions
- With Coffee – Serve a slice alongside hot coffee for an easy afternoon treat.
- With Tea – The gentle cocoa and vanilla flavors pair beautifully with black, chai, or herbal tea.
- For Valentine’s Day – Add red or white sprinkles for a festive dessert.
- For Holidays – Decorate the frosting with seasonal sprinkles or a light dusting of cake crumbs.
- For Birthdays – Add candles and colorful sprinkles to turn the loaf into a simple celebration cake.
- As a Dessert Plate – Serve with fresh berries for a beautiful contrast against the red velvet cake.
- For Brunch – Thin slices make a lovely addition to a weekend brunch spread.
Tips for the Best Results
- Don’t Overmix the Batter: Once the flour has been incorporated, stop mixing. Gentle mixing helps preserve the tender texture of the finished loaf.
- Use Room-Temperature Ingredients: Butter, eggs, and other refrigerated ingredients blend more smoothly when they’re not ice cold, helping create a more consistent batter.
- Measure Flour Carefully: Too much flour can make a loaf cake dry and heavy. Fluff the flour before measuring and avoid packing it tightly into the measuring container.
- Let the Cake Cool Completely: Frosting a warm loaf can cause the topping to melt and become difficult to spread. Patience makes a big difference here.
- Check the Cake Before Removing It: Oven temperatures can vary, so look for a set center and moist crumbs rather than relying only on the clock. A properly baked loaf should feel gently springy when touched.
Storage Tips
Refrigerator
Store the frosted red velvet loaf in an airtight container and refrigerate it if your kitchen is warm or if you want to keep it for several days.
Before serving, allow individual slices to sit at room temperature briefly. This helps soften the cake and frosting for a better texture.
Freezer
For longer storage, freeze the unfrosted loaf after it has cooled completely. Wrap it tightly to protect it from freezer air and place it in a freezer-safe container or bag.
The frosting can be prepared separately and added after the cake has thawed. This helps preserve the smooth appearance of the vanilla topping.
Reheating
Red velvet loaf cake usually doesn’t need traditional reheating. If you prefer a softer, slightly warmer slice, let it come to room temperature first.
If you warm a slice, use very gentle heat for a short time and avoid overheating the frosting.
Final Thoughts
This Red Velvet Loaf Cake with Vanilla Frosting is proof that a beautiful dessert doesn’t have to be complicated. The cake has a soft, tender crumb, a subtle cocoa flavor, and that unmistakable red velvet color, while the creamy vanilla frosting adds a sweet finishing touch.
What makes this recipe especially appealing is its simplicity. There are no complicated cake layers to assemble and no elaborate decorating skills required. Just bake the loaf, let it cool, spread on the frosting, and slice.
Whether you’re making it for a holiday gathering, a birthday, an afternoon treat, or simply because you want something homemade, this easy red velvet loaf cake is the kind of dessert that’s worth saving and making again.

Red Velvet Loaf Cake with Vanilla Frosting – Easy and Delicious
Ingredients
Red Velvet Loaf Cake
- 1 ¾ cups all-purpose flour
- 2 tbsp unsweetened cocoa powder
- 1 tsp baking powder
- ½ tsp baking soda
- ½ tsp salt
- ½ cup unsalted butter softened
- ¾ cup granulated sugar
- 2 large eggs
- ¼ cup vegetable oil
- ¾ cup buttermilk
- 2 tsp vanilla extract
- 1 tbsp red food coloring
- 1 tsp white vinegar
Vanilla Frosting
- ½ cup unsalted butter softened
- 2 cups powdered sugar
- 2 tsp vanilla extract
- 2-3 tbsp heavy cream
- ⅛ tsp salt
Instructions
- Prepare the Loaf Pan: Preheat the oven to 350°F (175°C). Grease a 9 x 5-inch loaf pan and line it with parchment paper, leaving some parchment hanging over the sides for easy removal.
- Mix the Dry Ingredients: In a medium bowl, whisk together the all-purpose flour, cocoa powder, baking powder, baking soda, and salt until evenly combined. Set aside.
- Cream the Butter and Sugar: In a large mixing bowl, beat the softened butter and granulated sugar until light, fluffy, and creamy, about 2–3 minutes.
- Add the Eggs: Beat in the eggs one at a time, mixing well after each addition. Scrape down the sides of the bowl if needed.
- Add the Wet Ingredients: Mix in the vegetable oil, buttermilk, vanilla extract, red food coloring, and white vinegar until the mixture is smooth and evenly colored.
- Combine the Wet and Dry Mixtures: Gradually add the dry ingredients to the wet mixture. Mix gently just until the flour disappears. Avoid overmixing, as this can make the loaf dense.
- Fill the Loaf Pan: Pour the red velvet batter into the prepared loaf pan. Smooth the surface with a spatula and gently tap the pan on the counter to release any large air bubbles.
- Bake the Cake: Place the loaf in the preheated oven and bake for 45–55 minutes, or until a toothpick inserted into the center comes out clean or with a few moist crumbs.
- Cool Completely: Let the cake cool in the pan for 10–15 minutes. Carefully lift it out using the parchment paper and transfer it to a wire rack. Allow it to cool completely before frosting.
- Make the Vanilla Frosting: Beat the softened butter until creamy. Gradually add the powdered sugar and mix until smooth. Add the vanilla extract, salt, and heavy cream. Beat until the frosting is light, fluffy, and easy to spread.
- Frost the Loaf: Spread the vanilla frosting evenly over the completely cooled red velvet loaf. Use an offset spatula or the back of a spoon to create soft decorative swirls.
- Decorate and Serve: If desired, sprinkle red velvet cake crumbs over the frosting for decoration. Slice the loaf with a sharp knife and serve.
Notes
- Use room-temperature butter and eggs for a smoother, more evenly mixed batter.
- Don’t overmix once the flour is incorporated, as this can make the loaf dense.
- Allow the cake to cool completely before frosting so the vanilla frosting stays thick and creamy.
- For a deeper red color, adjust the amount of red food coloring according to the type and strength of the coloring you use.
- Store the frosted loaf in an airtight container in the refrigerator for up to 4 days.
- For longer storage, freeze the unfrosted cake tightly wrapped for up to 2 months.
- Let refrigerated slices sit at room temperature for a few minutes before serving for the best texture.
Nutrition Facts
- Calories: 465 kcal
- Total Fat: 22 g
- Saturated Fat: 12 g
- Cholesterol: 90 mg
- Sodium: 270 mg
- Total Carbohydrates: 65 g
- Dietary Fiber: 1 g
- Total Sugars: 43 g
- Protein: 5 g
Leave a Reply