
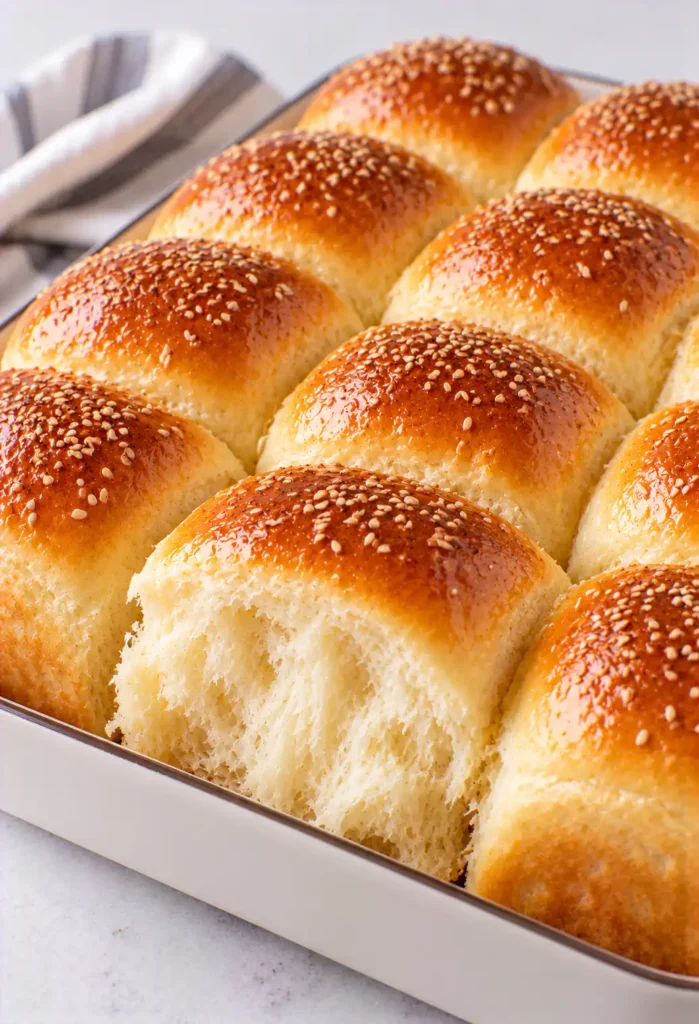
There is something special about a batch of freshly baked bread rolls coming out of the oven. These Fluffy Sandwich Rolls have a soft, tender center, a lightly golden crust, and just enough structure to hold everything from deli meats and cheese to grilled chicken and fresh vegetables.
After years of baking bread, I’ve found that the best sandwich rolls don’t need complicated ingredients or elaborate techniques. What matters most is giving the dough enough time to develop, handling it gently, and knowing when it has risen properly.
These homemade rolls are wonderfully versatile. Make them for weekday lunches, weekend breakfasts, family dinners, picnics, or whenever you want a fresh alternative to store-bought bread.
Table of Contents
Why You’ll Love These Fluffy Sandwich Rolls – Soft and Golden
- Soft & Fluffy: The interior has a light, tender texture that makes every sandwich feel bakery-fresh without being overly heavy.
- Golden & Delicious: A beautifully golden exterior gives the rolls a subtle crust while keeping the inside soft enough for sandwiches.
- Perfect for Sandwiches: Their shape and texture make them ideal for turkey, ham, chicken, tuna salad, burgers, cheese, and fresh vegetables.
- Simple Homemade Bread: You don’t need complicated bread-making techniques. With a little patience during rising, these rolls come together beautifully.
- Make-Ahead Friendly: Bake a batch and keep some ready for busy weekdays. They freeze especially well, making homemade bread much more convenient.
What Makes Homemade Better?
Homemade sandwich rolls have a freshness that is difficult to reproduce with packaged bread. The aroma alone is enough to make the kitchen feel warm and inviting.
You also have complete control over the texture. These rolls are designed to be soft enough for sandwiches while still sturdy enough to hold flavorful fillings without falling apart.
I particularly recommend serving them slightly warm with butter. However, once cooled, they make excellent sandwich rolls and can be used throughout the week.
Ingredients You’ll Need
- All-purpose flour – Provides the main structure while keeping the rolls soft and pleasantly light.
- Warm milk – Adds richness and moisture while helping create a tender crumb.
- Warm water – Helps hydrate the flour and creates the right environment for the yeast.
- Active dry yeast – Gives the dough its rise and helps create those fluffy, airy interiors.
- Granulated sugar – Adds a touch of sweetness and gives the yeast a little food to help it activate.
- Salt – Balances the flavor and prevents the bread from tasting flat.
- Unsalted butter – Adds richness and helps produce a soft, tender texture.
- Large egg – Adds richness, structure, and a beautiful golden color to the finished rolls.
- Egg wash – Creates the shiny, golden surface that makes these homemade rolls look bakery-worthy.
- Sesame seeds or poppy seeds – Optional toppings that add a little crunch and extra visual appeal.
Step-By-Step Direction
1. Activate the Yeast
Combine the warm milk, warm water, sugar, and yeast in a small bowl. Let the mixture sit for several minutes until the yeast becomes foamy.
The liquid should feel comfortably warm rather than hot. Water that is too hot can damage the yeast.
2. Make the Dough
Add the flour and salt to a large mixing bowl. Pour in the yeast mixture, followed by the melted butter and egg.
Stir until a shaggy dough begins to form. Once the ingredients are mostly combined, transfer the dough to a lightly floured surface.
3. Knead Until Smooth
Knead the dough until it becomes smooth, soft, and elastic. This usually takes several minutes by hand.
The dough should feel slightly tacky but shouldn’t be excessively sticky. Avoid adding too much flour because that can make the finished rolls heavy.
4. Let the Dough Rise
Place the dough in a lightly greased bowl and cover it with a clean kitchen towel or plastic wrap.
Let it rise in a warm, draft-free location until it has noticeably increased in size, usually about double.
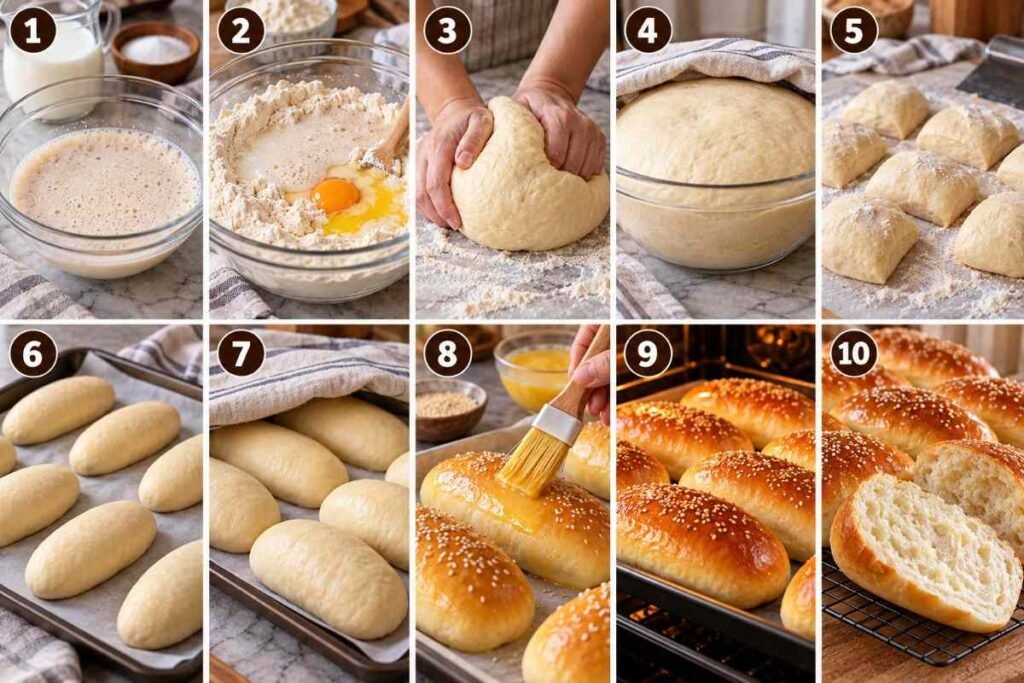
5. Divide the Dough
Gently press down the risen dough to release excess air. Transfer it to a lightly floured surface and divide it into equal portions.
Try to keep the portions similar in size so the rolls bake evenly.
6. Shape the Rolls
Shape each portion into a smooth ball, then gently flatten and shape it into a slightly elongated roll suitable for sandwiches.
Place the shaped rolls on a parchment-lined baking sheet, leaving enough room between them for expansion.
7. Let Them Rise Again
Cover the shaped rolls loosely and let them rest again until they look noticeably puffy.
This second rise is important because it helps create the light, airy texture that makes homemade sandwich rolls so fluffy.
8. Add the Egg Wash
Whisk the egg wash until smooth and gently brush it over the tops of the risen rolls.
If desired, sprinkle sesame seeds or poppy seeds over the surface before baking.
9. Bake Until Golden
Bake the rolls in a preheated oven until they are puffed and beautifully golden on top.
The kitchen should smell wonderfully buttery and bready when they are close to being finished.
10. Cool and Serve
Transfer the baked rolls to a wire rack and allow them to cool slightly before slicing.
For the softest crust, you can lightly brush the warm rolls with melted butter immediately after baking.
Serving Suggestions
- Classic Deli Sandwiches: Fill with turkey, ham, cheese, lettuce, tomato, and your favorite sandwich spread.
- Chicken Sandwiches: Use the rolls for grilled chicken, crispy chicken, or shredded chicken sandwiches.
- Breakfast Rolls: Fill with scrambled eggs, cheese, bacon, or sausage for a hearty homemade breakfast.
- Sliders: Shape smaller portions of dough to create soft homemade slider buns for parties and gatherings.
- Soup & Salad: Serve warm rolls alongside tomato soup, chicken soup, chili, or a fresh garden salad.
- Butter & Jam: Enjoy a warm roll with butter and fruit preserves for a simple breakfast or afternoon snack.
Tips for the Best Results
- Don’t Overheat the Liquid: Warm liquids should feel comfortably warm, not hot. Excessive heat can interfere with the yeast and prevent the dough from rising properly.
- Avoid Excess Flour: The dough should be soft and slightly tacky rather than dry. Adding too much flour can result in dense, heavy rolls.
- Give the Dough Time: Proper rising is one of the biggest secrets to fluffy bread. Look at the dough’s size and texture rather than relying only on the clock.
- Shape Gently: Avoid squeezing all the air out of the dough when forming the rolls. Gentle handling helps preserve the light texture developed during fermentation.
- Don’t Skip the Second Rise: The final proof gives the shaped rolls their beautiful volume. Let them become noticeably puffy before brushing and baking.
Storage Tips
Refrigerator
Once completely cooled, store the sandwich rolls in an airtight container or sealed bag.
They can be refrigerated for about 3–4 days, although refrigeration can make bread lose some of its softness. Warm them briefly before serving to bring back a more tender texture.
Freezer
These rolls freeze beautifully. Allow them to cool completely, then place them in a freezer-safe bag or airtight container.
Freeze for up to 3 months for the best quality. For convenient meal prep, freeze individual rolls so you can thaw only what you need.
Reheating
For a soft texture, warm individual rolls in the microwave for about 10–20 seconds.
You can also wrap them loosely in foil and warm them in a low oven. If reheating frozen rolls, allow them to thaw first for the most even result.
Final Thoughts
These Fluffy Sandwich Rolls are one of those homemade bread recipes worth keeping close. They are soft, golden, versatile, and much more satisfying than reaching for a packaged loaf.
Once you get comfortable making them, you’ll find plenty of reasons to bake another batch. Use them for sandwiches during the week, serve them alongside dinner, or warm one up with butter for a simple homemade treat.
The key is patience. Give the yeast time to work, keep the dough soft, and avoid rushing the rising stages. That’s how you get those wonderfully fluffy rolls with a golden finish and tender center.

Fluffy Sandwich Rolls – Soft and Golden
Ingredients
Dough
- 3 cups all-purpose flour
- ½ cup warm milk
- ½ cup warm water
- 2 ¼ tsp active dry yeast
- 2 tbsp granulated sugar
- 1 tsp salt
- 3 tbsp unsalted butter melted
- 1 large large egg
Egg Wash
- 1 large egg
- 1 tbsp water
Optional Toppings
- 1 tbsp sesame seeds
- 1 tbsp poppy seeds
Instructions
- Activate the Yeast: Combine the warm milk, warm water, granulated sugar, and active dry yeast in a small bowl. Let the mixture sit for about 5–10 minutes, until the yeast becomes foamy on top.
- Make the Dough: Add the flour and salt to a large mixing bowl. Pour in the yeast mixture, melted butter, and egg. Stir until a soft, shaggy dough begins to form.
- Knead the Dough: Transfer the dough to a lightly floured surface and knead for about 7–10 minutes, until smooth, soft, and elastic. The dough should feel slightly tacky but not excessively sticky.
- First Rise: Place the dough in a lightly greased bowl and cover it with a clean kitchen towel. Let it rise in a warm, draft-free area for about 1 hour, or until doubled in size.
- Divide the Dough: Gently press down the risen dough to release excess air. Transfer it to a lightly floured surface and divide it into 8 equal portions.
- Shape the Rolls: Shape each portion into a smooth, slightly elongated roll. Place the shaped rolls on a parchment-lined baking sheet, leaving enough space between them for expansion.
- Second Rise: Cover the shaped rolls loosely with a clean kitchen towel and let them rise for about 25–30 minutes, or until noticeably puffy.
- Apply the Egg Wash: Preheat the oven to 375°F. Whisk the egg with the water, then gently brush the mixture over each risen roll. Sprinkle with sesame seeds or poppy seeds if desired.
- Bake Until Golden: Bake for about 16–18 minutes, or until the rolls are puffed and beautifully golden brown on top.
- Cool and Serve: Transfer the rolls to a wire rack and let them cool for several minutes. For an especially soft crust, lightly brush the warm rolls with melted butter before serving.
Notes
- For the softest sandwich rolls, avoid adding too much extra flour while kneading. The dough should remain soft and slightly tacky.
- The rising time can vary depending on the temperature of your kitchen. Instead of relying only on the clock, look for dough that has approximately doubled in size during the first rise and looks noticeably puffy after shaping.
- For a softer crust, brush the freshly baked rolls with a little melted butter while they are still warm.
- These rolls can be used for turkey and cheese sandwiches, chicken sandwiches, breakfast sandwiches, sliders, burgers, or served alongside soups and salads.
- Storage: Store cooled rolls in an airtight container for up to 3 days. Freeze for up to 3 months for longer storage.
Nutrition Facts
- Calories: 435 kcal
- Carbohydrates: 68 g
- Protein: 12 g
- Fat: 12 g
- Saturated Fat: 6 g
- Cholesterol: 105 mg
- Sodium: 690 mg
- Fiber: 2 g
- Sugar: 7 g
Nutrition information is an estimate and can vary depending on the specific ingredients and brands used.
Leave a Reply