
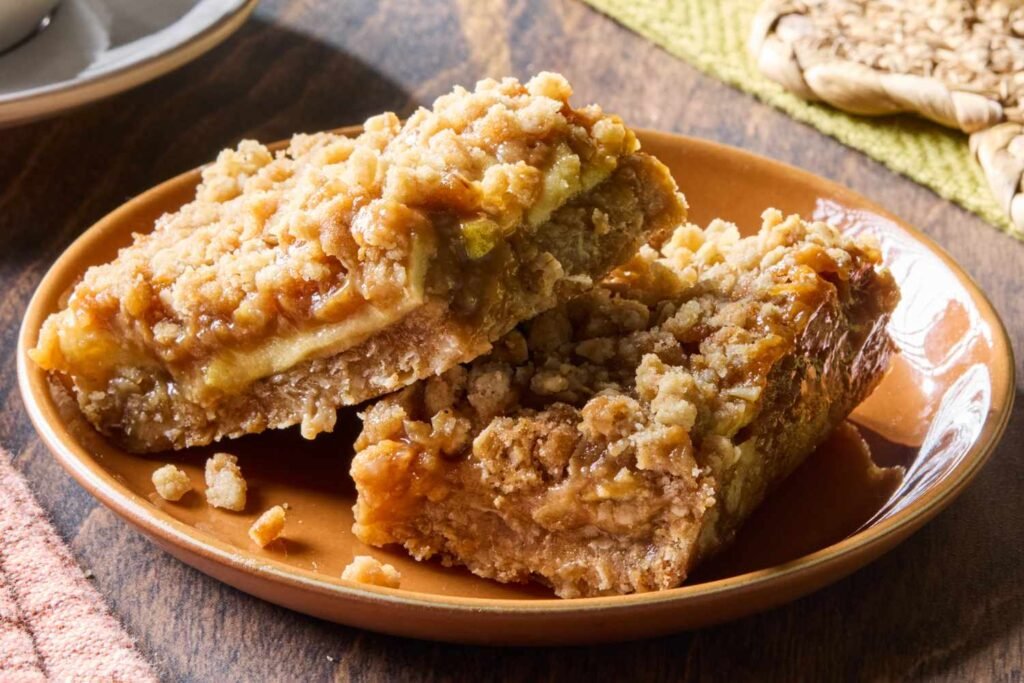
If you love the cozy combination of apples, cinnamon, and buttery caramel, these Easy Caramel Apple Bars deserve a spot on your fall baking list. They have a soft, buttery base, tender cinnamon-spiced apples, a layer of rich caramel, and a lightly crisp topping that makes every bite taste like a shortcut version of homemade apple pie.
What makes these apple bars especially appealing is how simple they are. You don’t need to fuss with pie crust or spend hours in the kitchen. Everything comes together in layers and bakes into a dessert that’s perfect for family gatherings, bake sales, potlucks, holidays, or an ordinary afternoon when you want something sweet.
The combination of apples and caramel is a classic fall flavor pairing, and similar caramel apple bar recipes commonly use a cookie-style base, fresh apples, caramel topping, and cinnamon.
Table of Contents
Why You’ll Love Easy Caramel Apple Bars
- Easy From Start to Finish: These bars use straightforward ingredients and simple layering, so you can get a homemade dessert into the oven without complicated baking techniques.
- Classic Caramel Apple Flavor: Sweet caramel, juicy apples, and warm cinnamon come together for that familiar fall flavor everyone looks forward to.
- Perfect for Sharing: Cut them into small squares and you’ve got an easy dessert for potlucks, parties, bake sales, lunchboxes, or holiday dessert tables.
- Soft, Buttery and Slightly Crisp: The tender apple layer contrasts beautifully with the buttery base and crumbly topping, giving every bite a satisfying texture.
- A Great Alternative to Apple Pie: You get the comforting flavors of apple pie without having to roll, chill, and shape a traditional pie crust.
What Makes Homemade Better?
There is something special about making caramel apple bars at home. Fresh apples bring a brighter fruit flavor, while homemade layers give you more control over the sweetness and texture.
You can also choose the type of apple you prefer, adjust the amount of cinnamon, add chopped nuts, or finish the bars with an extra caramel drizzle.
Most importantly, homemade bars taste fresh from the oven. The buttery crust becomes lightly golden, the apples soften into a fragrant filling, and the caramel melts into all those cozy flavors.
Ingredients You’ll Need
- All-purpose flour – Creates the sturdy but tender structure that holds the apple and caramel layers together.
- Old-fashioned oats – Add a pleasant chewy texture and give the crumb topping a rustic homemade feel.
- Brown sugar – Brings deep, caramel-like sweetness that works beautifully with the apples.
- Granulated sugar – Adds clean sweetness while helping the crust develop a lightly golden finish.
- Unsalted butter – Gives the bars their rich, buttery flavor and helps create a tender crumb.
- Fresh apples – Choose firm apples that hold their shape while baking and provide a naturally sweet-tart contrast.
- Caramel sauce – Creates the signature caramel layer and adds richness to every bite.
- Ground cinnamon – Adds warm spice and makes the apple flavor taste even more comforting.
- Vanilla extract – Rounds out the flavors with a subtle sweet aroma.
- Salt – Balances the sweetness and helps bring out the caramel and apple flavors.
- Chopped pecans or walnuts – Optional, but they add a delicious nutty crunch to the topping.
Step-By-Step Direction
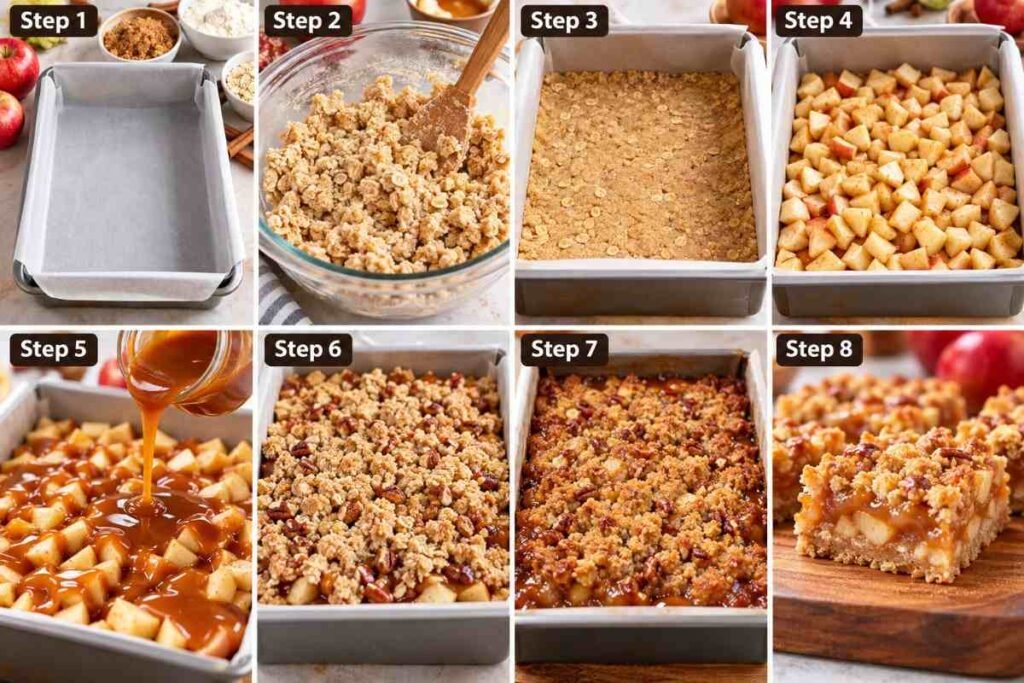
Step 1: Prepare the Baking Pan
Preheat your oven and prepare a baking pan with parchment paper, leaving enough paper hanging over the sides to make the finished bars easier to lift out.
Lightly grease the parchment so the buttery base releases cleanly.
Step 2: Make the Buttery Crumb Mixture
Combine the flour, oats, brown sugar, granulated sugar, cinnamon, and salt in a mixing bowl.
Work the softened butter into the mixture until it becomes crumbly and holds together when gently pressed.
Set aside some of the crumb mixture to use as the topping.
Step 3: Build the Bottom Layer
Press most of the crumb mixture firmly into the prepared baking pan.
Try to create an even layer from corner to corner. A flat-bottomed measuring cup or the back of a spoon makes this step easier.
Bake the base briefly until it begins to look lightly golden around the edges.
Step 4: Add the Apples
Peel and finely chop the apples so they cook evenly.
Scatter the apples over the warm crust, making sure they’re spread into a fairly even layer.
A firm apple with a pleasant sweet-tart flavor works especially well for baked apple desserts.
Step 5: Add the Caramel
Drizzle the caramel sauce generously over the apple layer.
The caramel should reach across the apples rather than sitting in only one spot. This helps distribute the caramel flavor throughout the bars.
Step 6: Add the Crumb Topping
Sprinkle the reserved crumb mixture over the caramel and apples.
Don’t press the topping down too firmly. Leaving some loose crumbs creates a more textured, golden topping as the bars bake.
If you’re using chopped pecans or walnuts, scatter them over the top now.
Step 7: Bake Until Golden
Return the pan to the oven and bake until the topping is golden and the apple layer is tender.
You’ll know they’re getting close when the kitchen smells strongly of warm cinnamon, baked apples, and caramel.
Step 8: Cool Completely Before Cutting
This is one step worth waiting for.
Allow the bars to cool completely in the pan so the caramel can set and the layers have time to firm up. Once cool, lift them out using the parchment paper and cut into squares.
Serving Suggestions
- With vanilla ice cream – Serve a slightly warm bar with a scoop of vanilla ice cream for an easy apple-pie-inspired dessert.
- With extra caramel – Drizzle a little warm caramel sauce over each serving for an extra indulgent finish.
- With whipped cream – A spoonful of lightly sweetened whipped cream makes the bars feel especially festive.
- With coffee – The buttery caramel and cinnamon flavors pair beautifully with hot coffee or a latte.
- For fall gatherings – Arrange small squares on a dessert platter for Thanksgiving, Halloween parties, potlucks, or autumn bake sales.
- With chopped nuts – Add toasted pecans or walnuts on top for extra crunch and a richer flavor.
Tips for the Best Results
- Choose the Right Apples: Use firm apples that can withstand baking without turning completely mushy. A sweet-tart apple gives the caramel a particularly nice contrast.
- Don’t Skip the Cooling Time: The bars need time to set after baking. Cutting them while they’re very hot can cause the caramel and apple layer to spread.
- Keep the Crust Even: Press the bottom layer firmly and evenly into the pan so the finished bars hold together when sliced.
- Don’t Overload the Apple Layer: A balanced amount of chopped apple gives you tender fruit without making the center excessively wet.
- Watch the Final Bake: Look for a lightly golden crumb topping and bubbling caramel around the edges. Overbaking can make the bars dry instead of soft and buttery.
Storage Tips
Refrigerator
Place completely cooled caramel apple bars in an airtight container and refrigerate. They can be enjoyed chilled or brought to room temperature before serving.
For the best texture, keep the bars covered so they don’t absorb refrigerator odors or lose moisture.
Freezer
Wrap individual bars tightly or separate layers with parchment paper before placing them in a freezer-safe container.
Freeze until solid, then transfer to a sealed freezer bag or container. Thaw the bars in the refrigerator before serving.
Reheating
For a soft, freshly baked texture, let refrigerated bars sit at room temperature for a short time before serving.
You can also warm an individual bar gently in the microwave or in a low oven. Avoid overheating because the caramel can become extremely hot.
Final Thoughts
These Easy Caramel Apple Bars are the kind of dessert that makes simple ingredients feel special. You get tender apples, buttery crumbs, warm cinnamon, and rich caramel in every square, without the work involved in making a traditional apple pie.
They’re especially good during the cooler months, but there’s no reason to save them only for fall. Make a batch for a family dessert, weekend baking project, holiday gathering, or whenever you’re craving something sweet and cozy.
If you love easy apple desserts, caramel desserts, fall baking recipes, or homemade dessert bars, this is one recipe worth keeping close. Slice them small for sharing—or keep the biggest piece for yourself.
Easy Caramel Apple Bars
Ingredients
Base and Crumble
- 1 cup all-purpose flour — Creates the structure for the buttery crust and crumble.
- ½ cup old-fashioned rolled oats — Adds texture and a rustic oat topping.
- ⅓ cup packed brown sugar — Gives the bars a deep caramel-like sweetness.
- 2 tablespoons granulated sugar — Adds balanced sweetness to the crust.
- ½ teaspoon ground cinnamon — Brings warm spice to the dessert.
- ¼ teaspoon salt — Enhances the buttery and caramel flavors.
- ½ cup unsalted butter softened — Creates a rich, tender and buttery crumble.
Apple Filling
- 2 medium apples peeled and finely chopped — Use firm apples that hold their shape during baking.
- 1 tablespoon all-purpose flour — Helps absorb some of the moisture released by the apples.
- 1 tablespoon brown sugar — Adds extra sweetness to the apple layer.
- ½ teaspoon ground cinnamon — Gives the apples a classic warm fall flavor.
- ½ teaspoon vanilla extract — Adds a subtle sweet aroma.
- ¼ teaspoon salt — Balances the sweetness.
Caramel Layer
- ⅓ cup caramel sauce — Adds the signature rich caramel flavor.
- 1 tablespoon chopped pecans — Optional for extra crunch.
Instructions
- Prepare the Pan: Preheat the oven to 350°F. Line a 9-inch square baking pan with parchment paper, leaving some parchment hanging over the sides for easy removal. Lightly grease the parchment.
- Make the Crumble Mixture: In a large mixing bowl, combine the all-purpose flour, rolled oats, brown sugar, granulated sugar, cinnamon, and salt. Add the softened butter and mix with a pastry cutter or fork until the mixture becomes crumbly. Set aside about one-third of the mixture for the topping.
- Bake the Bottom Layer: Press the remaining crumble mixture firmly and evenly into the bottom of the prepared pan. Bake for about 10 minutes, or until the edges are lightly golden.
- Prepare the Apples: While the crust bakes, peel and finely chop the apples. Place them in a bowl and gently toss with flour, brown sugar, cinnamon, vanilla extract, and salt until evenly coated.
- Add the Apples and Caramel: Spread the seasoned apples evenly over the warm crust. Drizzle the caramel sauce over the apples, making sure it is distributed across the entire layer.
- Add the Crumble Topping: Sprinkle the reserved crumble mixture evenly over the caramel and apples. If using pecans, scatter the chopped nuts over the top.
- Bake: Return the pan to the oven and bake for about 25 minutes, or until the topping is golden brown and the caramel is bubbling around the edges.
- Cool and Slice: Remove the pan from the oven and let the bars cool completely for about 30 minutes. Lift them out using the parchment paper, then cut into squares. Serve with an optional drizzle of caramel sauce.
Notes
- Storage: Store cooled bars in an airtight container in the refrigerator for up to 4 days.
- Freezing: Wrap individual bars well and freeze for up to 2 months. Thaw overnight in the refrigerator.
- Reheating: Warm individual bars gently in the microwave for a few seconds before serving.
- Apple Tip: Firm apples such as Granny Smith or Honeycrisp work particularly well because they maintain a pleasant texture during baking.
- Serving Tip: Serve slightly warm with vanilla ice cream and an extra drizzle of caramel sauce for a classic caramel-apple dessert.
Nutrition Facts
- Calories: 560 kcal
- Total Fat: 27 g
- Saturated Fat: 15 g
- Cholesterol: 60 mg
- Sodium: 360 mg
- Carbohydrates: 76 g
- Fiber: 4 g
- Sugar: 44 g
- Protein: 5 g
Nutrition values are estimates and can vary depending on the specific brands and ingredients used.

[…] caramel apple bar is a self-serve dessert station where guests decorate whole apples or apple slices with caramel, […]