
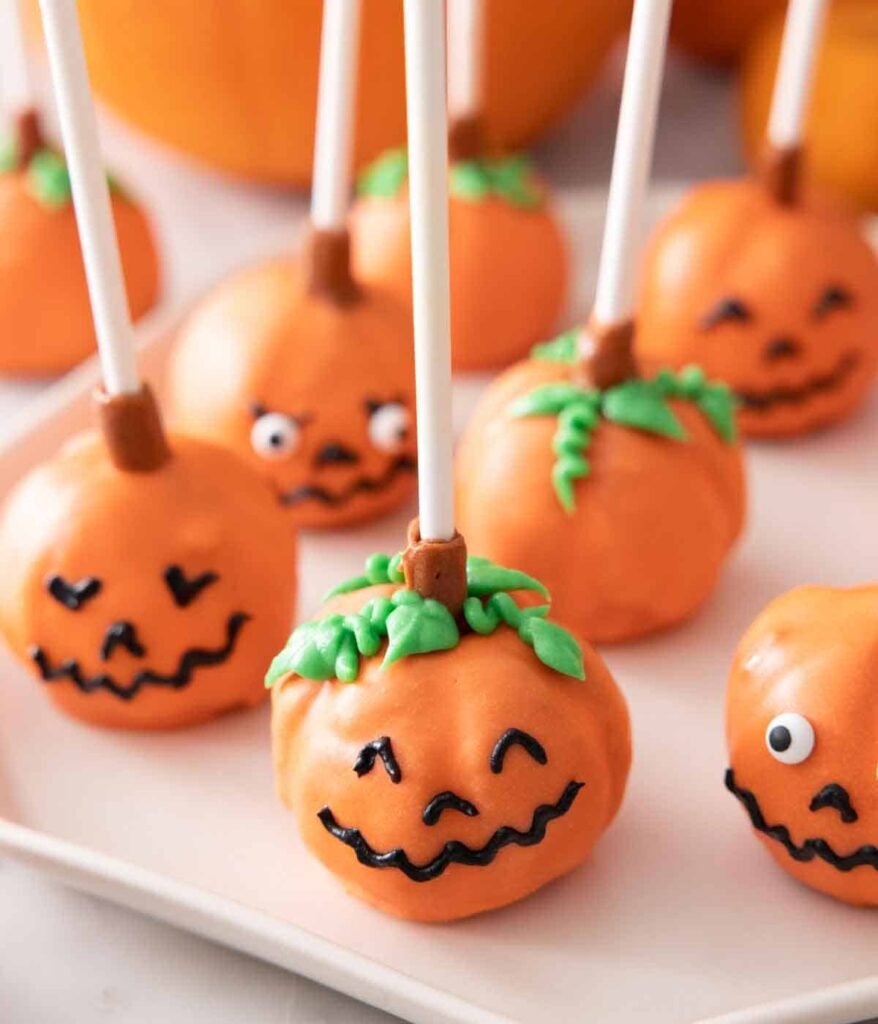
Halloween baking is always more fun when you can turn a familiar fall favorite into something playful. These Easy Pumpkin Pie Cake Pops for Halloween combine the cozy flavors of pumpkin pie with the fun, handheld shape of cake pops. They’re soft, moist, warmly spiced, and perfect for Halloween parties, school gatherings, fall celebrations, or a simple weekend baking project with the family.
The best part is that you don’t need complicated decorating skills to make them look festive. A pumpkin-spiced cake mixture is rolled into bite-sized balls, placed on sticks, dipped in a smooth coating, and decorated with simple Halloween-inspired details.
If you love pumpkin pie but want something a little more fun to serve, these pumpkin pie cake pops are an easy treat to add to your Halloween dessert table.
Table of Contents
Why You’ll Love These Easy Pumpkin Pie Cake Pops for Halloween
- Classic Pumpkin Pie Flavor: You get the comforting combination of pumpkin and warm fall spices in a fun cake-pop format. Every bite tastes like a little piece of autumn.
- Perfect for Halloween Parties: These cake pops are easy to serve without plates or forks. They make a colorful addition to Halloween dessert tables and party spreads.
- Soft and Moist Center: The cake mixture creates a tender, rich center that contrasts beautifully with the sweet outer coating. They stay deliciously soft instead of becoming dry.
- Fun to Decorate: You can keep the decorations simple or get creative with Halloween colors, sprinkles, drizzles, and little pumpkin-inspired designs.
- Great Make-Ahead Dessert: The cake pops can be prepared ahead of your celebration. That makes them especially convenient when you’re already busy preparing other Halloween treats.
What Makes Homemade Better?
Homemade cake pops have something store-bought versions simply can’t match: freshness and flexibility.
You control the pumpkin flavor, spices, sweetness, coating, and decorations. Freshly prepared cake creates a much softer center, while homemade pumpkin pie spices give the cake pops that warm, nostalgic fall flavor.
They’re also much more fun to customize. You can make them elegant for an adult Halloween gathering, colorful for kids, or decorate them like tiny pumpkins for a classic fall look.
Most importantly, homemade cake pops allow you to make the dessert exactly the way you like it.
Ingredients You’ll Need
- Pumpkin Cake – Use a moist pumpkin cake as the flavorful base for these cake pops. Homemade or prepared cake both work well.
- Pumpkin Puree – Pure pumpkin adds moisture and gives the cake pops their signature pumpkin flavor. Use plain pumpkin puree rather than pumpkin pie filling.
- Cream Cheese Frosting – This helps bind the crumbled cake together while adding a subtle tanginess that balances the sweetness.
- Pumpkin Pie Spice – A blend of warm spices such as cinnamon, ginger, nutmeg, and cloves gives the cake pops their cozy pumpkin-pie flavor.
- Vanilla Extract – A little vanilla rounds out the pumpkin and spice flavors and makes the finished cake taste richer.
- White or Orange Candy Melts – These create the smooth outer shell. Orange coating is especially useful if you want a classic pumpkin-inspired Halloween appearance.
- Cake Pop Sticks – These make the cake pops easy to hold and serve. Paper or reusable cake-pop sticks can work.
- Halloween Sprinkles – Choose festive sprinkles to add texture, color, and an unmistakable Halloween look.
- Dark Chocolate or Decorating Icing – Use this for simple lines, faces, or other Halloween decorations.
- Cooking Spray or Melted Chocolate – A small amount can help secure the cake pops or make dipping easier when needed.
Step-By-Step Direction
1. Prepare the Pumpkin Cake
Bake your pumpkin cake until fully cooked; a toothpick inserted into the center should come out clean.
Let the cake cool completely before moving on. Warm cake can make the mixture too soft and difficult to shape.
2. Crumble the Cake
Once completely cooled, break the cake into a large mixing bowl.
Use your fingers or a fork to crumble it into very fine pieces. Large chunks can make the cake pops crack or fall apart later.
3. Add the Frosting
Add a small amount of cream cheese frosting to the cake crumbs and gently mix.
Continue adding frosting gradually until the mixture holds together when pressed. Avoid adding too much frosting because the cake pops can become overly soft.
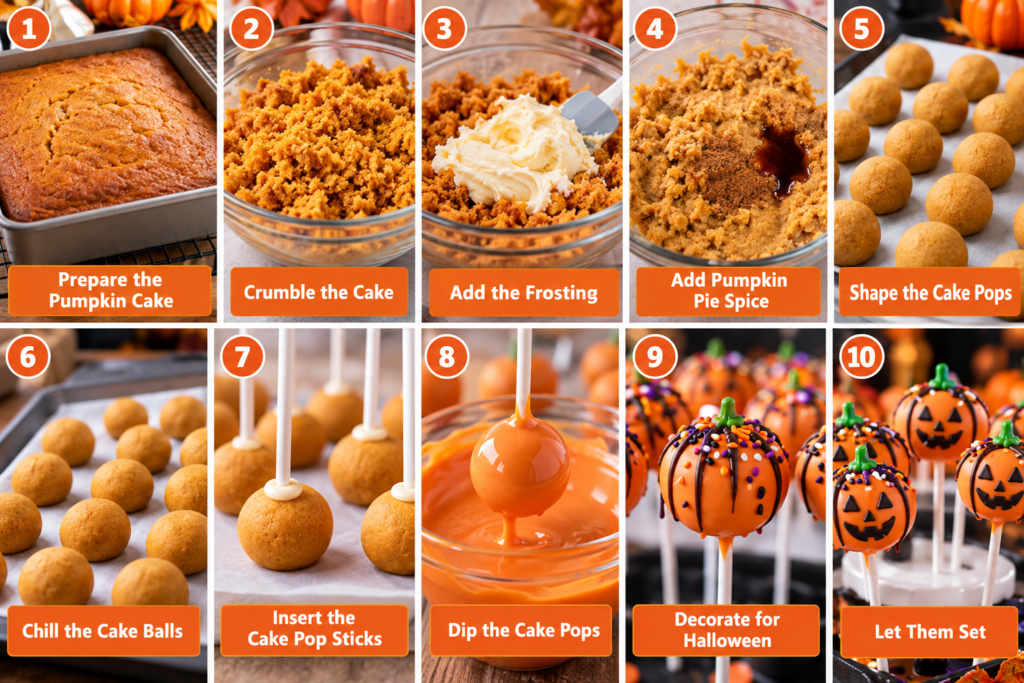
4. Add Pumpkin Pie Spice
Mix in the pumpkin pie spice and vanilla extract.
Taste a tiny amount of the mixture if desired and adjust the spice level to suit your preference. The goal is a balanced pumpkin-pie flavor rather than an overpowering spice taste.
5. Shape the Cake Pops
Scoop portions of the mixture and roll them between your palms until smooth.
Try to keep each cake ball similar in size so they look consistent when arranged on a serving platter.
6. Chill the Cake Balls
Place the shaped cake balls in the refrigerator until firm.
Chilling is important because it helps the cake pops hold their shape during dipping.
7. Insert the Cake Pop Sticks
Melt a small amount of the candy coating.
Dip the end of each cake-pop stick into the melted coating, then gently insert it into a cake ball. Allow the coating around the stick to set.
8. Dip the Cake Pops
Melt the remaining candy coating until smooth.
Dip each cake pop into the coating, allowing the excess to drip away. Gently rotate the cake pop rather than repeatedly stirring it through the coating.
9. Decorate for Halloween
While the coating is still wet, add Halloween sprinkles.
For a pumpkin-inspired look, drizzle contrasting chocolate over the top or add simple lines to resemble a pumpkin. You can also create tiny Halloween faces.
10. Let Them Set
Place the decorated cake pops upright or on parchment paper and allow the coating to completely firm up.
Once set, they are ready to serve.
Serving Suggestions
- Halloween Dessert Table: Arrange them alongside brownies, cookies, cupcakes, and other festive Halloween desserts.
- Kids’ Halloween Party: Let children choose their favorite sprinkles and decorations for a fun DIY dessert activity.
- Fall Family Gathering: Serve them with warm apple cider, hot chocolate, or coffee for a cozy autumn dessert.
- Halloween School Celebration: Their individual serving size makes them convenient for parties where guests need an easy grab-and-go treat.
- Pumpkin-Themed Party: Decorate them in shades of orange and brown to complement a pumpkin-inspired Halloween table.
- Dessert Gift: Wrap individual cake pops in clear treat bags and tie them with festive ribbon for a simple homemade gift.
Tips for the Best Results
- Don’t Overdo the Frosting: Add frosting gradually rather than all at once. Too much can make the cake mixture sticky and difficult to shape.
- Chill Before Dipping: Firm cake balls are much easier to coat. A properly chilled center is less likely to slide off the stick.
- Keep the Coating Smooth: Melt the candy coating gently and stir frequently. Overheating can make it thick and difficult to work with.
- Don’t Overload With Decorations: Add sprinkles and decorations while the coating is still wet, but keep them balanced. Too many decorations can make the cake pops heavy.
- Make Them Uniform: Try to make the cake balls approximately the same size. This gives your finished Halloween display a cleaner, more professional appearance.
Storage Tips
Refrigerator
Store finished cake pops in an airtight container in the refrigerator. They can generally be enjoyed for several days when properly covered.
Allow them to sit at room temperature briefly before serving if you prefer a softer cake texture.
Freezer
For longer storage, freeze the undecorated cake balls in an airtight freezer-safe container.
Once frozen solid, transfer them to a freezer bag or tightly sealed container. Thaw them in the refrigerator before dipping and decorating.
You can also freeze finished cake pops, but protect them carefully from freezer moisture and odors.
Reheating
Cake pops should not normally be reheated. They are best served chilled or brought gently toward room temperature.
Avoid microwaving the finished cake pops because the candy coating can melt and the cake center may become overly soft.
Final Thoughts
These Easy Pumpkin Pie Cake Pops for Halloween are a fun way to turn classic pumpkin-pie flavors into a festive handheld dessert. The combination of moist pumpkin cake, creamy frosting, warm pumpkin pie spice, and a sweet coating makes every bite taste like fall.
They’re also wonderfully flexible. Keep the decoration simple for an easy homemade treat, or go all out with Halloween sprinkles, chocolate drizzles, and pumpkin-inspired designs.
Whether you’re preparing a Halloween party, a fall gathering, or simply looking for a fun pumpkin dessert to make with your family, these cake pops are a delicious treat worth saving.
Easy Pumpkin Pie Cake Pops for Halloween
Ingredients
Pumpkin Cake
- 1 cup all-purpose flour – gives the cake its tender structure
- ½ cup granulated sugar – adds balanced sweetness
- ½ cup pumpkin puree – use pure pumpkin puree not pumpkin pie filling
- 1 large egg – helps bind the cake and adds richness
- ¼ cup vegetable oil – keeps the pumpkin cake soft and moist
- ½ teaspoon baking powder – helps the cake rise
- ½ teaspoon baking soda – creates a light texture
- 1 teaspoon pumpkin pie spice – adds classic warm fall flavor
- 1 teaspoon vanilla extract – enhances the pumpkin and spice flavors
- ¼ teaspoon salt – balances the sweetness
Cake Pop Mixture
- ⅓ cup cream cheese frosting – binds the cake crumbs and adds creamy flavor
Coating & Decoration
- 8 ounces orange candy melts – creates the festive pumpkin-colored coating
- 8 cake Pop sticks – use sturdy sticks for easy serving
- 2 tablespoons Halloween sprinkles – choose orange black, white, or purple sprinkles
- 1 ounce dark chocolate – use for pumpkin lines or Halloween faces
- 8 green candy pieces – optional for pumpkin stems
Instructions
- Prepare the Pumpkin Cake: Preheat your oven to 350°F. In a mixing bowl, combine the flour, sugar, pumpkin puree, egg, vegetable oil, baking powder, baking soda, pumpkin pie spice, vanilla extract, and salt. Mix until the batter is smooth and evenly combined. Transfer the batter to a greased baking pan and bake until a toothpick inserted into the center comes out clean. Let the cake cool completely.
- Crumble the Cake: Once the pumpkin cake has cooled completely, break it into small pieces. Crumble the cake finely with your fingers or a fork until there are no large pieces remaining.
- Add the Frosting: Add the cream cheese frosting gradually to the cake crumbs. Mix gently until the mixture comes together and holds its shape when pressed. Avoid adding too much frosting, as the mixture can become overly soft.
- Add the Pumpkin Pie Spice: Add the pumpkin pie spice and mix thoroughly so the warm spices are evenly distributed throughout the cake mixture. The mixture should have a rich pumpkin-pie aroma.
- Shape the Cake Pops: Scoop portions of the cake mixture and roll them between your palms to form smooth, evenly sized balls. Place the cake balls on a parchment-lined tray.
- Chill the Cake Balls: Refrigerate the cake balls until they are firm. Chilling helps them maintain their shape and makes them easier to coat without falling apart.
- Insert the Cake Pop Sticks: Melt a small amount of the orange candy coating. Dip the end of each cake-pop stick into the melted coating, then gently insert it into the center of a chilled cake ball. Allow the coating to set briefly.
- Dip the Cake Pops: Melt the remaining orange candy coating until smooth. Dip each cake pop into the coating, gently rotating it until completely covered. Allow the excess coating to drip back into the bowl.
- Decorate for Halloween: While the coating is still wet, add Halloween sprinkles. Drizzle the cake pops with melted dark chocolate to create pumpkin lines or spooky faces. Add a small green candy piece on top if desired to resemble a pumpkin stem.
- Let the Cake Pops Set: Place the decorated cake pops upright in a cake-pop stand or carefully on parchment paper. Allow the coating to become completely firm before serving.
Notes
- Cool the Cake Completely: Make sure the pumpkin cake is completely cool before adding the frosting. Warm cake can make the mixture too soft and difficult to shape.
- Add Frosting Gradually: Start with a small amount of frosting and mix well before adding more. The mixture should be moist enough to hold together without becoming sticky.
- Chill Before Dipping: Refrigerate the shaped cake balls before inserting the sticks and dipping them in the candy coating. This helps prevent cracking and keeps the cake pops securely on the sticks.
- Decorate While the Coating Is Wet: Add sprinkles, chocolate details, or pumpkin decorations immediately after dipping. The decorations will stick properly before the coating hardens.
Nutrition Facts
- Calories: 360 kcal
- Carbohydrates: 51 g
- Protein: 4 g
- Fat: 16 g
- Saturated Fat: 5 g
- Cholesterol: 45 mg
- Sodium: 250 mg
- Fiber: 2 g
- Sugar: 34 g

Leave a Reply