
If you’ve ever stood over the kitchen counter eating Nutella straight from the jar with a spoon (no judgment here), then these cookies were made for you. Nutella Thumbprint Cookies take everything you love about a classic butter cookie and give it a rich, hazelnut-chocolate center that makes them genuinely hard to stop eating. They look bakery-worthy, but the truth is they come together in under 30 minutes with ingredients you probably already have.
Forget the traditional jam-filled thumbprint. As much as I respect the classic, the jam version never really excited me. These? These are a whole different story.
Table of Contents
Why You will Love These Nutella Thumbprint Cookies:
- They deliver serious flavor without serious effort. The dough itself is buttery and lightly sweet — almost shortbread-like — which makes it the perfect backdrop for the deep, chocolatey richness of Nutella. The contrast is everything.
- From mixing bowl to cooling rack in about 30 minutes. No elaborate techniques, no hard-to-find ingredients. Just a simple, reliable cookie that consistently turns out beautifully. Whether you’re throwing together a last-minute dessert or prepping for a holiday cookie swap, this recipe has your back.
- They freeze like a dream. Freeze the dough, freeze the baked cookies — either way works. I always keep a stash in the freezer so I can pull one out whenever the craving hits. There’s something genuinely satisfying about a freezer-ready treat that tastes just as good weeks later.
Recipe Ingredients:
- Unsalted butter — softened to room temperature, but not greasy or melted. You should be able to press your finger into it and leave a clean indent.
- Brown sugar + white sugar — the combination gives these cookies depth of flavor and a slight chewiness. Light or dark brown sugar both work.
- One large egg — room temperature for the smoothest incorporation.
- Vanilla extract — pure if you can swing it, but imitation will do in a pinch.
- Almond extract (optional but highly recommended) — just a small amount adds a subtle warmth that rounds out the flavor in a way vanilla alone can’t quite achieve.
- Cornstarch — the secret weapon. It keeps the cookies soft, slightly pillowy, and helps them hold their shape so the Nutella has somewhere to sit.
- All-purpose flour — weighed when possible for the most accurate results. If you’re scooping with a measuring cup, spoon the flour in and level it off rather than packing it. A 1:1 gluten-free baking flour substitution works well here too.
- Baking powder — double-check it’s fresh and that it’s baking powder, not soda.
- Salt — a small pinch sharpens all the other flavors. Cut back slightly if you’re using salted butter.
- Nutella — or any chocolate hazelnut spread you love. No brand loyalty required. For a nut-free household, a chocolate sunflower seed butter or chocolate coconut spread makes a great swap.
Step-By-Step Instructions:

Step 1: Cream the butter and sugars. Using a hand mixer or stand mixer, beat the softened butter with both sugars on medium-high speed for about 3 full minutes. You’re looking for a noticeably lighter color and fluffy texture. Don’t rush this step — proper creaming is what keeps these cookies from going flat in the oven.
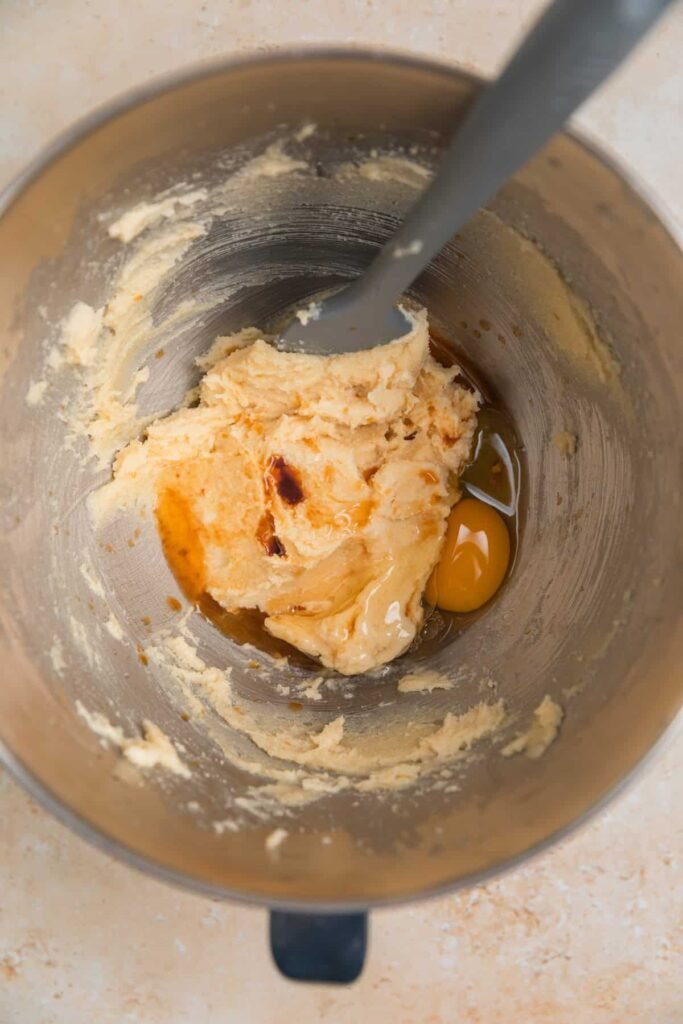
Step 2: Add the wet ingredients. Mix in the egg, vanilla extract, and almond extract until fully combined and smooth.
Step 3: Whisk the dry ingredients. In a separate bowl, whisk together the flour, cornstarch, baking powder, and salt.
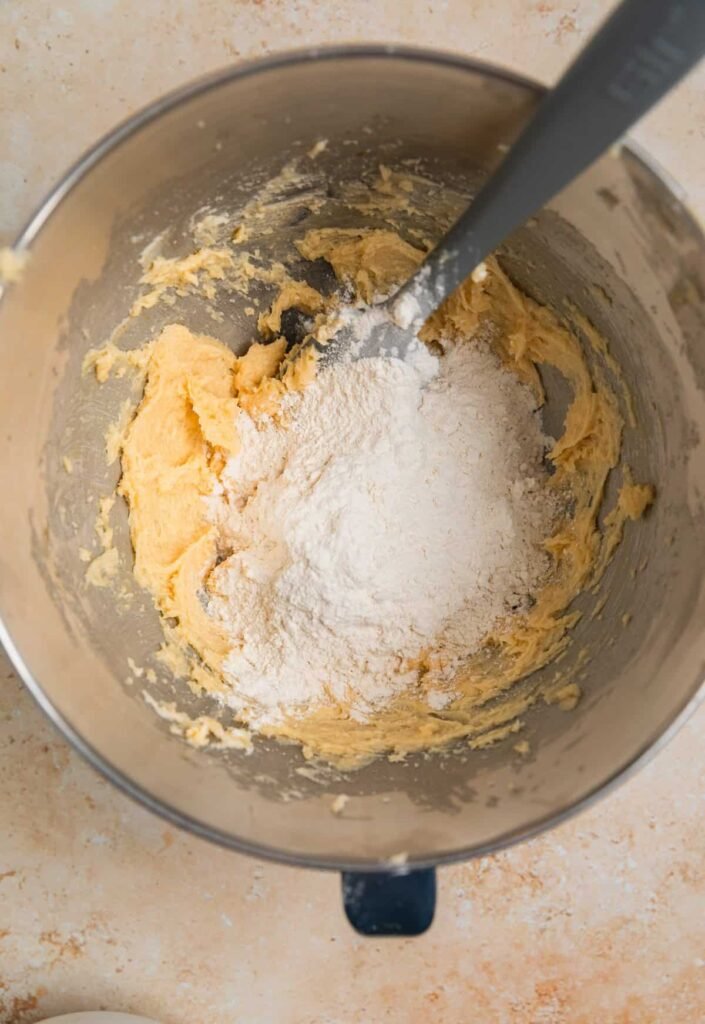

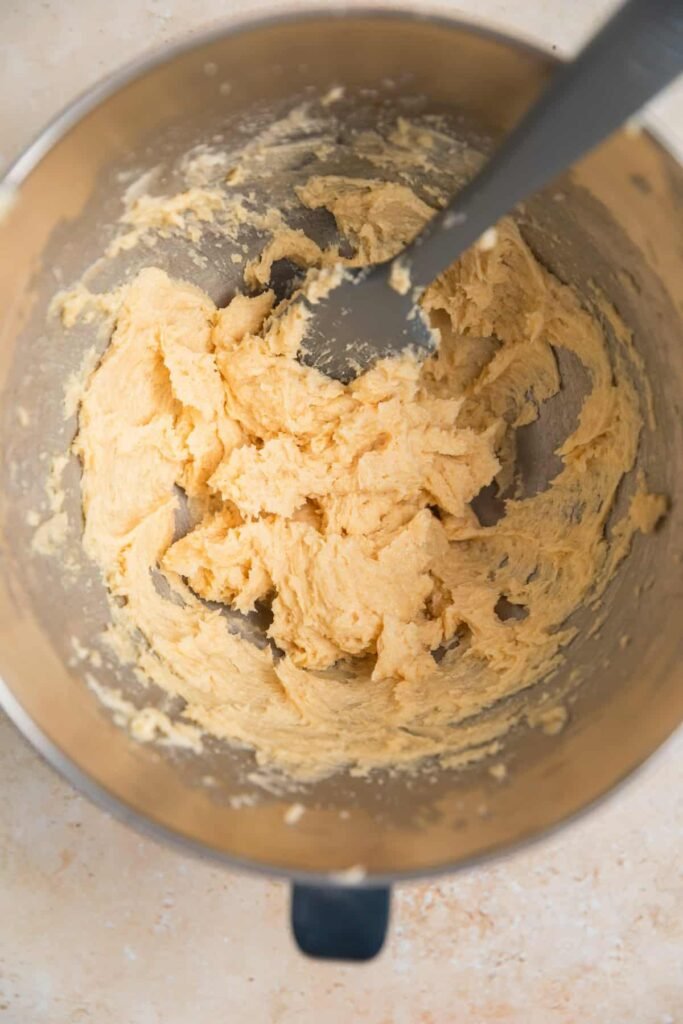
Step 4: Bring the dough together. Add the flour mixture to the butter mixture in thirds, mixing just until incorporated after each addition. The dough will come together — if it looks slightly crumbly at first, gently press it into itself and it’ll smooth out.
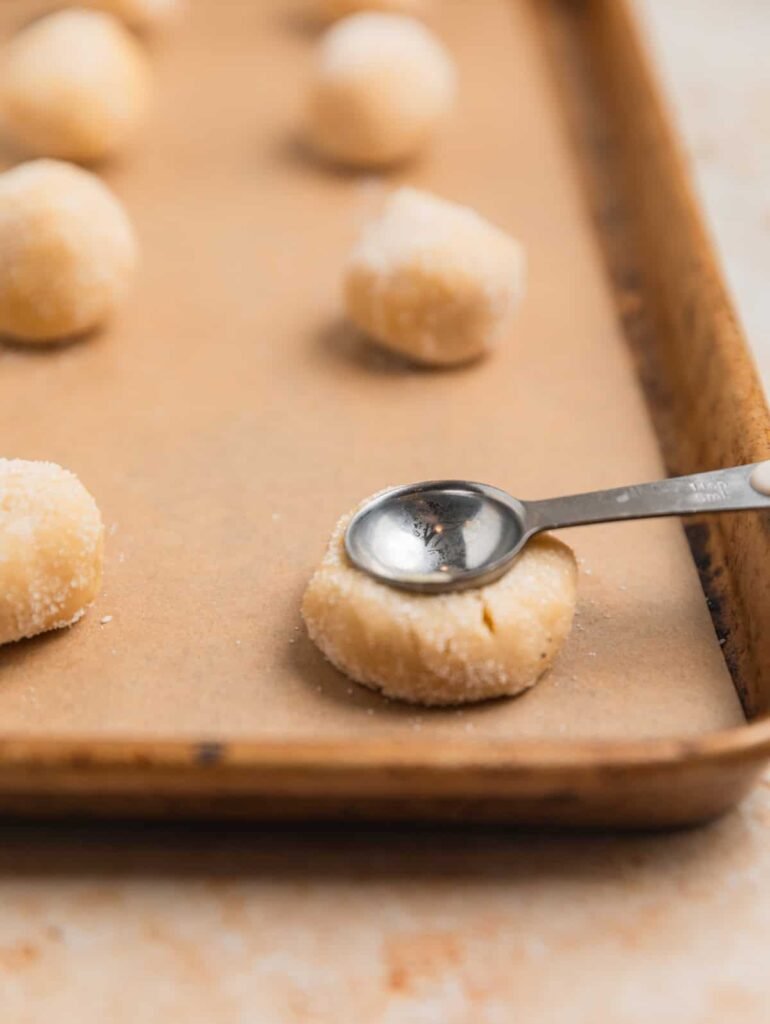
Step 5: Shape before chilling (this matters!). Using a cookie scoop, portion the dough into balls (roughly 1½ tablespoons or 22g each). Roll each ball in granulated sugar, then use the back of a round teaspoon to press a deep well into the center. Do this before refrigerating — pressing cold dough will crack the edges and they won’t look as clean or hold their shape as well.
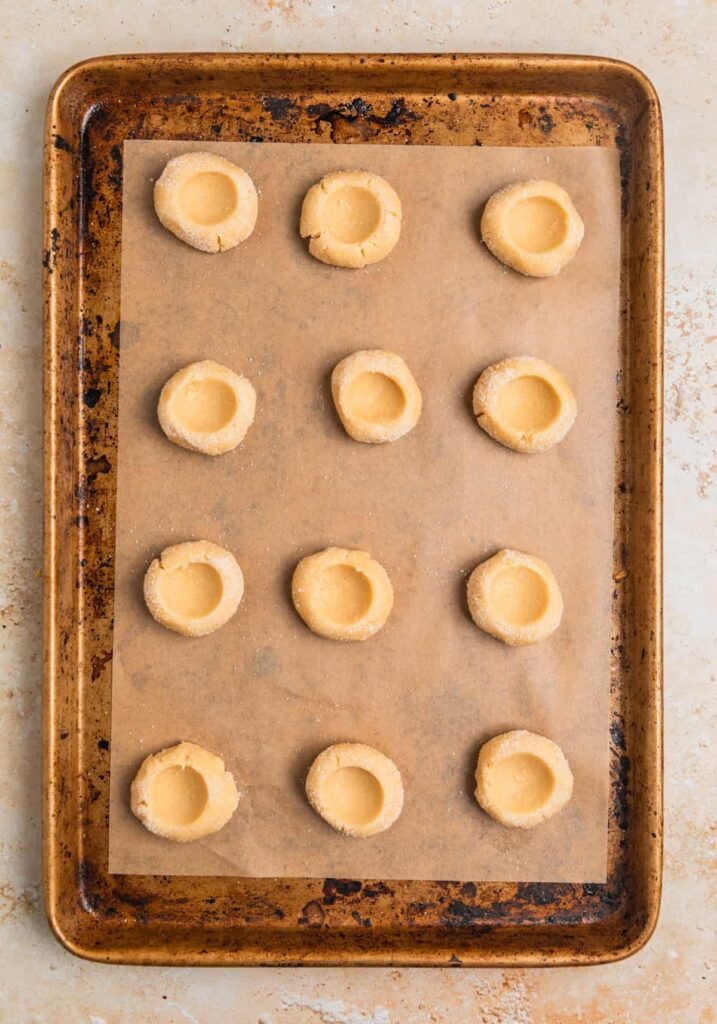
Step 6: Chill. Place the shaped, pressed cookie dough balls on a plate or tray and refrigerate for 30 minutes. This keeps them from spreading and helps them bake up tall and tender.
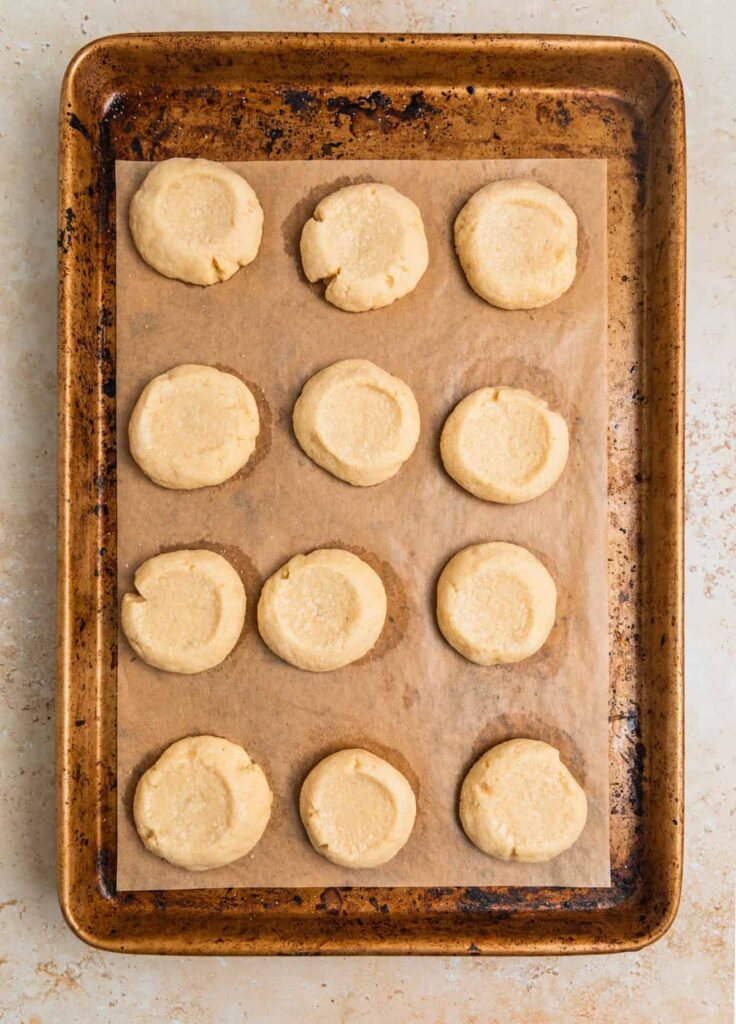
Step 7: Bake. Preheat your oven and line a baking sheet with parchment paper. Arrange the chilled dough balls with space between them and bake for 9–10 minutes, until the edges are just set. The bottoms will be lightly golden. They may look slightly underdone — that’s what you want.
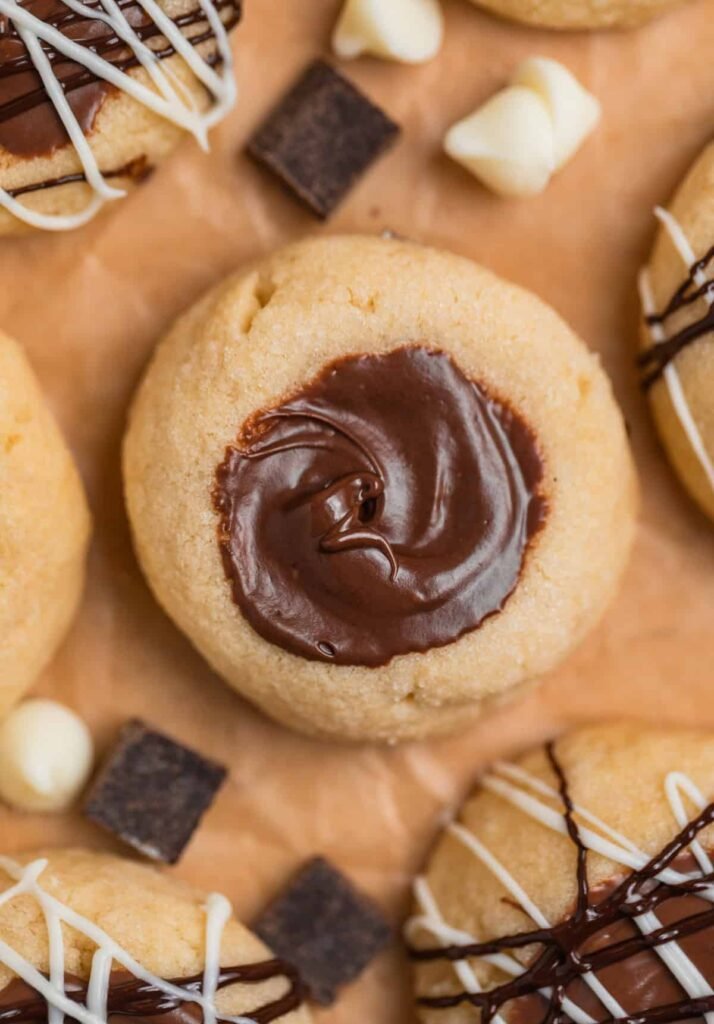
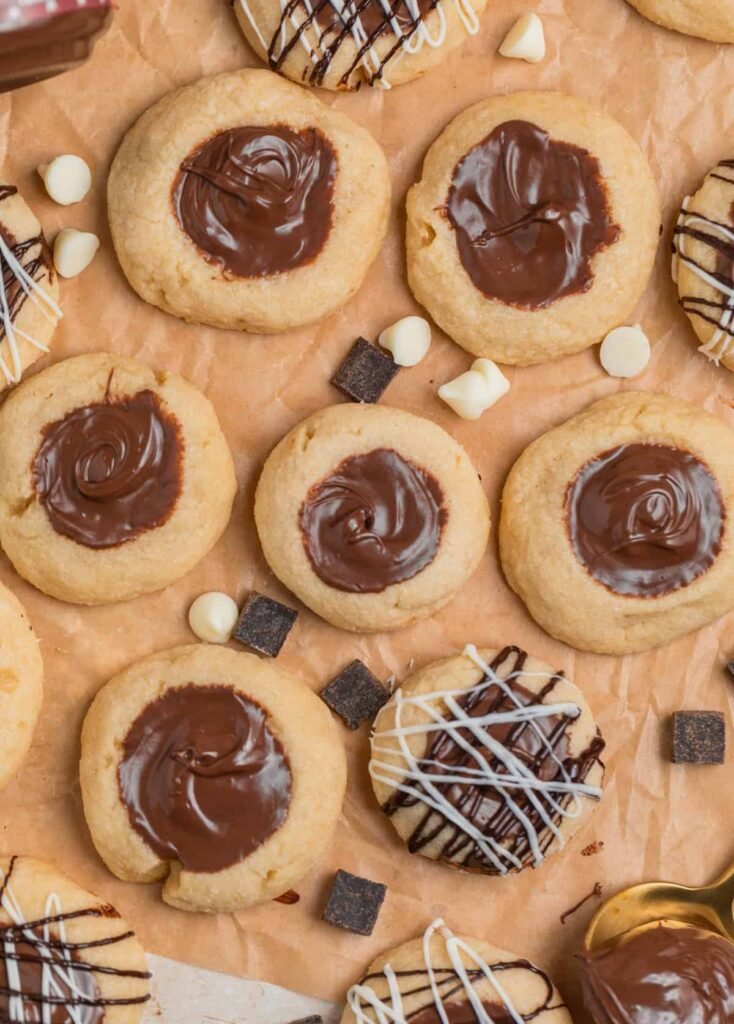
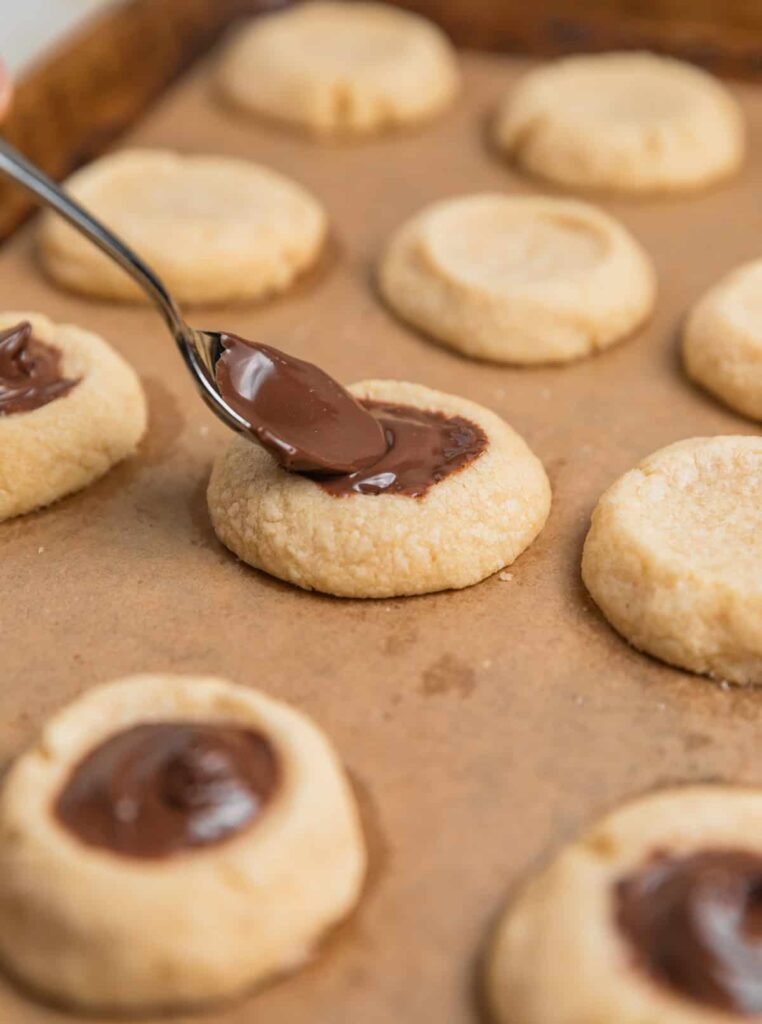
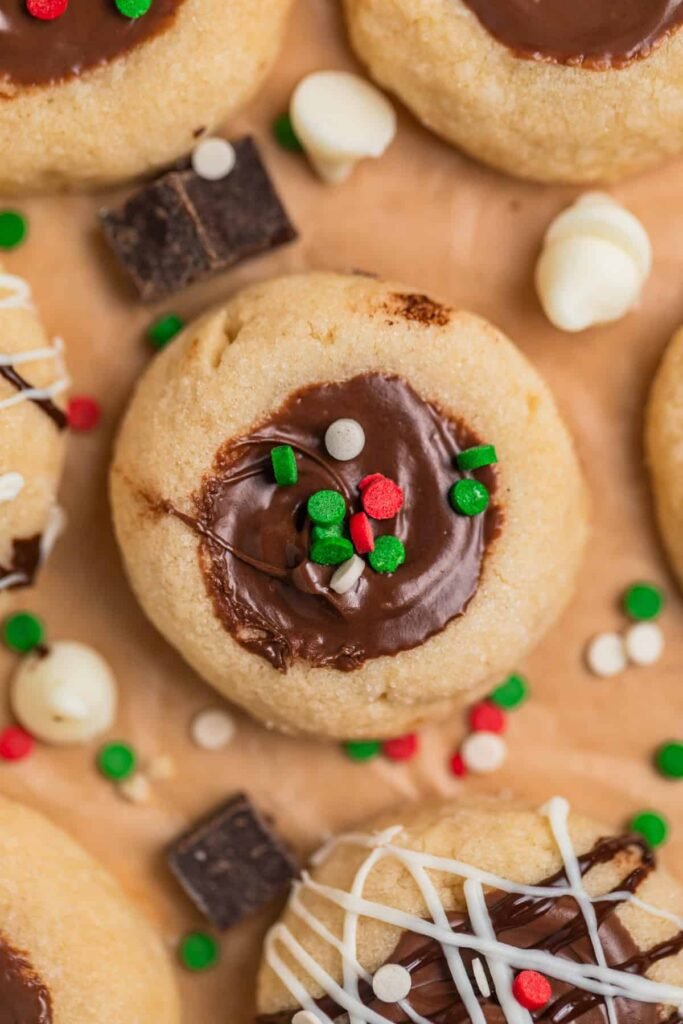
Step 8: Fill with Nutella. Let the cookies cool on the pan for 5–7 minutes, then spoon about 1 teaspoon of Nutella into each center. It will melt slightly into the warm cookie — that’s the goal. Add sprinkles, a drizzle of melted chocolate, or leave them as-is. Transfer to a wire rack and cool completely.
Recipe Tips
- Press the thumbprint before the dough chills, not after. This is the single most important technique tip in this recipe. Cold dough cracks at the edges when pressed, which means your cookies lose that clean, pretty look. Shape and press while the dough is still pliable, then chill.
- Watch your butter temperature. Butter that’s too cold won’t cream properly. Butter that’s too soft (especially if it’s started to look shiny or slick) will cause the cookies to spread too much in the oven. The sweet spot: room temperature butter that gives slightly when pressed but still holds its shape.
- Room temperature eggs blend better. Cold eggs can cause the butter to seize up slightly during mixing, leading to uneven texture. If you forgot to pull your egg out ahead of time, a quick 5-minute soak in warm water will bring it to temp.
- Don’t overbake. Edges set, bottoms lightly golden — that’s the cue to pull them. They’ll firm up as they cool, and an underdone cookie is always better than an overdone one when it comes to thumbprints.
Storage:
At room temperature: Store in an airtight container for up to 5 days. They’ll be at their best in the first 3.
In the freezer (baked): Cool completely, then flash freeze on a flat tray for 1 hour before transferring to a freezer-safe bag or container. Keeps well for up to 3 months.
In the freezer (unbaked dough): Wrap tightly in plastic wrap, then store in an airtight container for up to 3 months. You can also freeze already-shaped and pressed dough balls using the same flash-freeze method.
Ways To Vary This Recipe:
- Roll the dough balls in chopped toasted hazelnuts instead of sugar for a nutty crunch that plays off the hazelnut in the Nutella perfectly.
- Stir a drop of peppermint extract into the Nutella before filling for a cool mint-chocolate combination, especially great around the holidays.
- Top with crushed candy canes or peppermint bark pieces right after adding the warm Nutella so they stick.
- Drizzle with melted white and dark chocolate for a polished, bakery-style finish that makes these gift-worthy.
- Swap the Nutella for chocolate peanut butter, biscoff spread, or raspberry jam to put your own spin on the classic.
- Add seasonal sprinkles — red and green for Christmas, pastels for spring, orange and black for Halloween. The sugar-coated base makes them versatile for every occasion.
Frequently Asked Questions
Can I make these cookies without a mixer?
You can, but it takes some elbow grease. The key is getting the butter soft enough to cream by hand using a wooden spoon or silicone spatula. It’ll take closer to 5–6 minutes of vigorous stirring to get the light, fluffy texture you’re after.
Can I use a different chocolate spread instead of Nutella?
Absolutely. Any chocolate hazelnut spread works. For nut-free options, chocolate sunflower seed butter, chocolate tahini, or a nut-free chocolate coconut spread all work well. Cookie butter is another delicious option if you want something different entirely.
My Nutella looks solid after cooling — is that normal?
Yes, completely normal. Nutella firms up as it cools, especially if your kitchen runs cool. If you prefer a softer, glossier center, you can gently warm the cookies for a few seconds in the microwave before serving.
Can I make these gluten-free?
Yes! A 1:1 gluten-free all-purpose baking flour (one that includes xanthan gum) works well as a direct substitute. The texture will be very similar, though the cookies may be slightly more delicate. Make sure your Nutella or chocolate spread is also certified gluten-free if needed.
Why do my thumbprints crack around the edges?
This happens when the indentation is pressed into already-chilled dough. Always shape and press the cookies before refrigerating, not after. The warm, pliable dough holds the shape cleanly without cracking.

Nutella Thumbprint Cookies
Ingredients
- 1 cup (226g) Unsalted butter Softened to room temperature
- ½ cup Brown sugar Light or dark both work
- ¼ cup White granulated sugar Plus extra for rolling
- 1 large Egg Room temperature
- 1 ½ tsp Vanilla extract Pure preferred
- ¼ tsp Almond extract Optional but recommended
- 2 cups (240g) All-purpose flour Spooned and leveled, or weighed
- 1 ½ tsp Cornstarch Keeps cookies soft and thick
- ½ tsp Baking powder Make sure it's fresh
- ¼ tsp Salt
- ¾ cup Nutella Or any chocolate hazelnut spread
Instructions
- Step 1 — Cream butter and sugars Using a hand mixer or stand mixer fitted with the paddle attachment, beat the softened butter, brown sugar, and white sugar together on medium-high speed for about 3 full minutes until the mixture is noticeably lighter in color and fluffy in texture. Don't cut this step short — proper creaming is what keeps these cookies from going flat.Step 2 — Add wet ingredients Add the egg, vanilla extract, and almond extract to the creamed butter mixture. Beat until everything is fully combined and smooth, scraping down the sides of the bowl as needed.Step 3 — Mix dry ingredients In a separate bowl, whisk together the all-purpose flour, cornstarch, baking powder, and salt until evenly combined.Step 4 — Combine Add the flour mixture to the butter mixture in three additions, mixing on low speed just until incorporated after each addition. Once all the flour is mixed in, gently press the dough together if it looks slightly crumbly — it will come together smoothly.Step 5 — Shape and press (before chilling!) Using a 1½-tablespoon cookie scoop, portion the dough into balls. Roll each ball in granulated sugar to coat. Use the back of a round teaspoon measuring spoon to press a deep, clean well into the center of each ball. Do this step before refrigerating — pressing cold dough will crack the edges.Step 6 — Chill Place the shaped and pressed cookie dough balls on a plate or tray. Refrigerate for 30 minutes. This step is key to preventing the cookies from spreading in the oven.Step 7 — Preheat and bake Preheat your oven to 350°F (175°C). Arrange chilled cookie dough balls on a parchment-lined baking sheet, spacing them about 2 inches apart. Bake for 9–10 minutes, until the edges are just set and the bottoms are lightly golden. They may look slightly underdone in the center — that's perfect.Step 8 — Fill with Nutella Remove cookies from the oven and let them sit on the baking sheet for 5–7 minutes. Spoon approximately 1 teaspoon of Nutella into the center well of each cookie. The warmth of the cookie will help the Nutella settle in and melt slightly. Add sprinkles or a drizzle of melted chocolate if desired.Step 9 — Cool completely Transfer the filled cookies to a wire rack and let them cool completely before storing or serving.
Notes
- Press before you chill — always form and press the thumbprint indentation into the dough balls before refrigerating. Pressing cold dough causes cracks around the edges.
- Butter temperature matters — it should be soft enough to leave a finger indent, but not shiny or greasy. Overly soft butter causes cookies to spread too thin.
- Weigh your flour when possible. Too much flour makes dry, dense cookies; too little causes spreading. If you don’t have a scale, spoon flour into the measuring cup and level off the top — never scoop directly.
- Filling swaps: Nutella can be replaced with biscoff spread, chocolate peanut butter, vanilla almond butter, sunflower seed butter (nut-free option), or classic jam for a traditional thumbprint.
- Make it festive: Roll dough in colored sugar or top filled cookies with seasonal sprinkles to match any holiday.
- Gluten-free option: Substitute a 1:1 gluten-free all-purpose baking flour for an equally delicious result.
- Storage: Room temperature in an airtight container for up to 5 days. Freeze baked cookies for up to 3 months (flash freeze first). Freeze raw shaped dough for up to 3 months.
Leave a Reply