
Five ingredients. Twenty minutes. Zero oven required. These No-Bake Oreo Cheesecake Cups are the kind of dessert that makes people think you spent hours in the kitchen — and you’ll never correct them.
Whether it’s a sweltering summer afternoon or you just need something crowd-pleasing on zero notice, this recipe delivers every single time.
Table of Contents
Why You Will Love These No-Bake Oreo Cheesecake Cups
- It’s shamelessly simple. Five pantry-friendly ingredients stand between you and dessert. No fancy technique, no special equipment — just a bowl, a mixer, and a little patience while it chills.
- Built-in portion control (sort of). Each cup is its own self-contained serving. No slicing, no scooping, no one arguing over who got the bigger piece. Just grab and go.
- No heat, no stress. Skipping the oven isn’t just convenient — it keeps your kitchen cool and your stress levels lower. Summer desserts should never require preheating.
- Naturally gluten-free friendly. Oreo now offers gluten-free varieties, making this one of the easiest swaps around. Everything else in the recipe is already GF — no substitutions needed.
- Infinitely riff-able. Think of this recipe as a canvas. Peanut butter Oreos, mint, golden, seasonal flavors — they all work beautifully. Make it yours.
Recipe Ingredients:
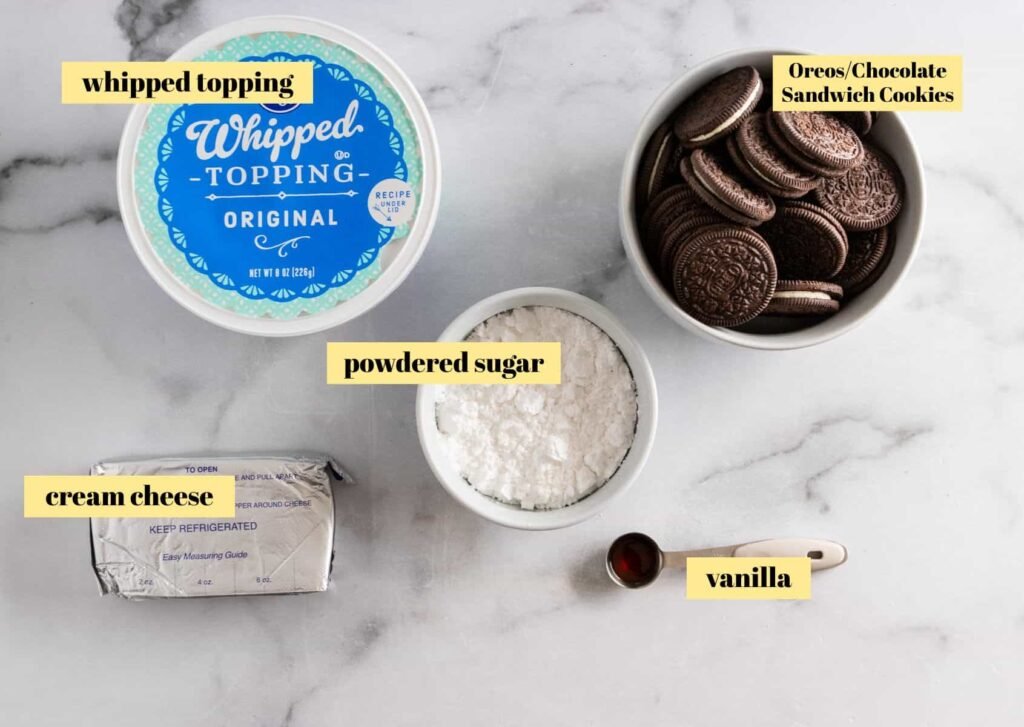
- Cream cheese — Full-fat gives you the richest, creamiest result. Reduced-fat works in a pinch, but skip the fat-free entirely.
- Powdered sugar — Sweetens the filling and helps it hold its shape.
- Vanilla extract — Just a splash, but it rounds out the flavor in a way you’d notice if it were missing.
- Cool Whip — The shortcut that keeps this recipe fast and light. Prefer the real thing? Whipped heavy cream works just as well.
- Oreos — Classic chocolate is the gold standard here, but Golden Oreos run a very close second. Use whatever flavor speaks to you.
How to make this recipe


Step 1: Crush the Oreos. No food processor needed. Toss your Oreos into a zip-lock bag and go at them with a rolling pin or a sturdy spoon. Aim for a mix of chunky pieces and fine crumbs — the texture variety is part of what makes every bite interesting.
Step 2: Build the base. Spoon about 1½ to 2 tablespoons of crushed Oreos into the bottom of each of your 6 dessert cups. Glass jars, ramekins, small bowls — whatever you have works.


Step 3: Make the cheesecake filling. Beat the softened cream cheese and powdered sugar together until completely smooth. Start slow — powdered sugar has a way of escaping dramatically. Add vanilla and mix until combined.
Step 4: Fold in the Cool Whip. Gently fold (don’t beat) the Cool Whip into the cream cheese mixture. You want to keep it light and airy.


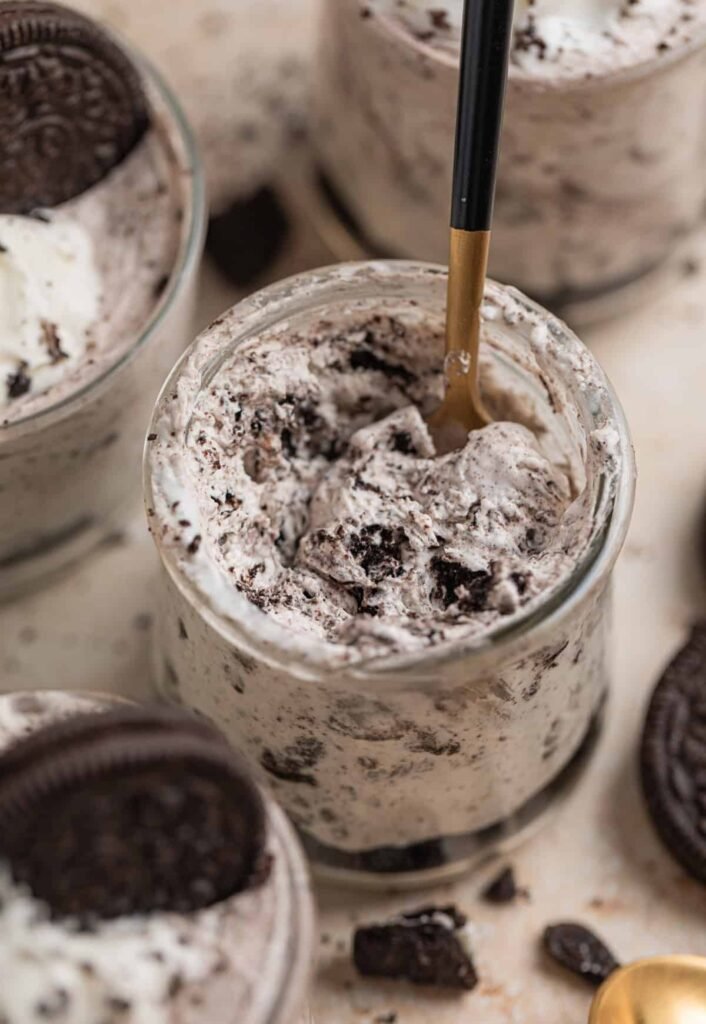
Step 5: Add the Oreos. Fold the remaining crushed Oreos into the filling. Try not to eat it straight from the bowl. (No judgment if you do.)
Step 6: Fill and chill. Spoon the filling evenly into your 6 prepared cups, pressing down lightly to fill any gaps around the crumb base. Refrigerate for at least 1 hour before serving.
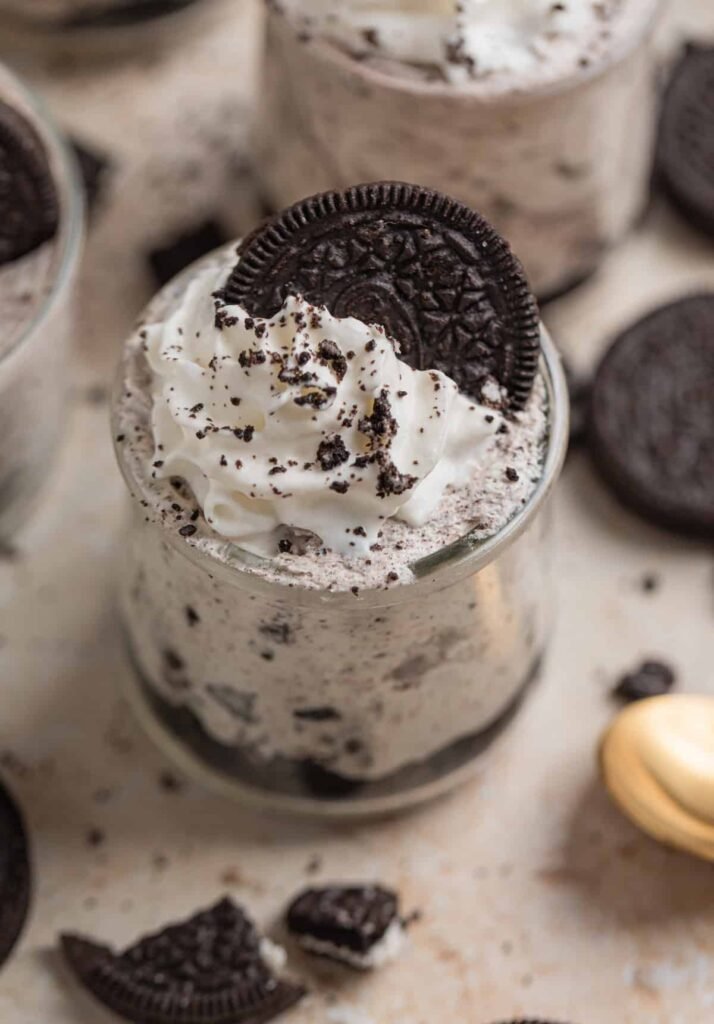
Step 7: Finish and serve. Top with whipped cream, a mini Oreo, and a sprinkle of cookie crumbs. Now you’re done.
Ways to Mix It Up
- Go minty: Add ½ teaspoon of peppermint extract and use Mint Oreos for a cookies-and-cream spin.
- Make it a parfait: Layer the Oreo crumbs and cheesecake filling in tall glasses for a more dramatic presentation.
- Bake it (sort of): Press the crumbs into a muffin tin lined with cupcake wrappers for neat, handheld cheesecake bites.
- Go big: Pour everything into an 8×8 pan for a shareable slab version. Build it in layers in a loaf pan for a striking cross-section when you slice into it.
How to Make This in One Dish:
If you’d prefer a more classic Oreo cheesecake style, you can prepare it in an 8×8-inch pan or a small baking dish. For easier slicing and serving, consider making a thicker Oreo crust, similar to the one used in a no-bake chocolate pie.
Another option is to use a loaf (bread) pan—simply layer crushed Oreos and cheesecake filling, repeating until everything is used.
Keep in mind, this cheesecake will firm up but won’t be sturdy enough for clean, picture-perfect slices like a traditional springform pan. Expect it to be a little soft and slightly messy when serving!
Storage
Refrigerator: Covered tightly, these keep well for up to 5 days. The Oreos will soften gradually — which some people actually prefer.
Freezer: Yes, you can freeze them. Wrap each cup twice for best results and thaw overnight in the refrigerator before serving.
FAQs
Can I make these ahead of time?
Absolutely — in fact, you should. Making them the night before lets the flavors meld and the filling set more firmly. They’re actually better on day two.
Can I use homemade whipped cream instead of Cool Whip?
Yes! Whip 1 cup of heavy cream to stiff peaks and fold it in exactly as you would Cool Whip. The texture will be slightly softer but the flavor is richer.
How many Oreos does this recipe use?
Plan on about 24–28 standard Oreos — roughly one sleeve. Half go into the base, half get folded into the filling, with a few reserved for garnish.
Can I use store-brand sandwich cookies?
You can, and they’ll taste good. That said, the filling-to-cookie ratio in name-brand Oreos is noticeably better, which does affect the final flavor. Worth the splurge here.
Do these need to be made in individual cups?
Not at all. One larger dish works fine — an 8×8 pan or even a loaf pan. Just know that slicing clean portions is trickier, so spoon-serving is your friend.
Can I double the recipe?
Easily. This recipe scales up without any adjustments needed. Great for parties or potlucks where individual cups make serving a breeze.

No-Bake OREO Cheesecake Cups
Ingredients
- 8 oz cream cheese softened to room temperature
- ½ cup powdered sugar
- 1 tsp vanilla extract
- 8 oz Cool Whip thawed; or homemade whipped cream
- 24-28 Oreos divided; classic or any flavor
Instructions
- Group: Make the Base1. Place Oreos in a zip-lock bag and crush with a rolling pin until you have a mix of chunks and crumbs. Set aside, reserving some for garnish.2. Spoon 1½ to 2 tablespoons of crushed Oreos into the bottom of each of 6 dessert cups and press lightly to form a base layer.Group: Make the Filling3. In a mixing bowl, combine the softened cream cheese and powdered sugar. Beat with a hand mixer on low at first, then increase speed until smooth and creamy.4. Add vanilla extract and beat until fully incorporated.5. Gently fold in the Cool Whip until light and fully combined — do not over-mix.6. Fold in the remaining crushed Oreos, leaving some texture.Group: Assemble and Chill7. Spoon the cheesecake filling evenly into the 6 prepared dessert cups, pressing down lightly to fill gaps around the crumb base.8. Refrigerate for at least 1 hour before serving.9. Top with whipped cream, a mini Oreo or cookie half, and a sprinkle of Oreo crumbs before serving.
Notes
- Make ahead: These are even better made the night before — the filling sets more firmly and the flavors deepen overnight.
- Flavor variations: Swap in any Oreo flavor — Golden, Mint, Peanut Butter, or seasonal varieties all work beautifully.
- Mint version: Add ½ tsp peppermint extract to the filling and use Mint Oreos.
- Gluten-free: Simply substitute gluten-free Oreos — everything else in the recipe is naturally GF.
- One-dish version: Pour into an 8×8 pan or a loaf pan layered with Oreo crumbs and filling.
- Storage: Keep covered in the refrigerator for up to 5 days. Can be frozen — wrap each cup tightly twice and thaw overnight in the fridge before serving.
- Tip: Make sure your cream cheese is fully softened before mixing to avoid lumps in the filling.
Leave a Reply